


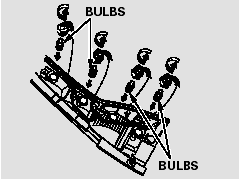
Lights
Headlight Aiming
The headlights were properly aimed when your vehicle was new. If you regularly carry heavy items in the cargo area or pull a trailer, readjustment may be required.
Adjustments should be done by your dealer or another qualified technician.
Replacing a Headlight Bulb
Your vehicle has halogen headlight bulbs. When replacing a bulb, handle it by its base, and protect the glass from contact with your skin or hard objects. If you touch the glass, clean it with denatured alcohol and a clean cloth.

Halogen headlight bulbs get very hot when lit. Oil, perspiration, or a scratch on the glass can cause the bulb to overheat and shatter.
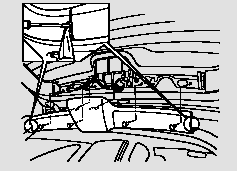
1. Open the hood.
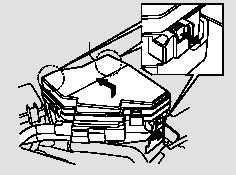
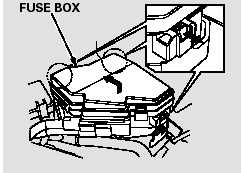
To change the headlight bulb on the driver’s side, remove the under-hood fuse box from its stay by pulling it out.
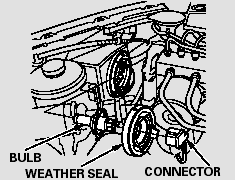
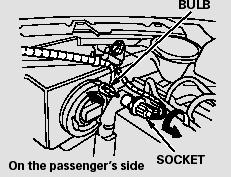
2. Remove the electrical connector from the bulb by pulling the connector straight back.
3. Remove the rubber weather seal by pulling on the tab.
4. Unclip the end of the hold-down wire from its slot. Pivot it out of the way, and remove the bulb.
5. Install the new bulb into the hole, making sure the tabs are in their slots. Pivot the hold-down wire back in place, and clip the end into the slot.
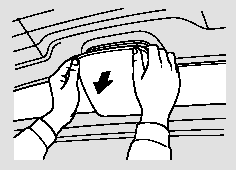
6. Install the rubber seal over the back of the headlight assembly.
Make sure one of the three arrows on the rubber seal is facing up; it is marked ‘‘->’’.
7. Push the electrical connector onto the new bulb. Make sure it is connected securely. Turn on the headlights to test the new bulb.
8. (Driver’s side)
Reinstall the under-hood fuse box.
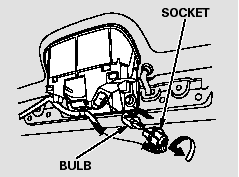
Replacing a Front Turn Signal Light Bulb
1. Open the hood.
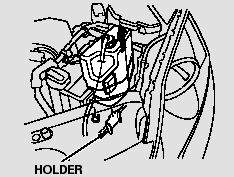
To change the turn signal bulb on the driver’s side, remove the engine coolant reserve tank by pulling it out of its holder.
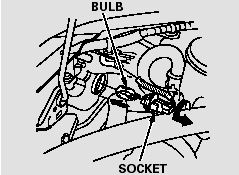
2. Remove the socket from the headlight assembly by turning it one-quarter turn counterclockwise.
3. Pull the bulb straight out of its socket. Push the new bulb straight into the socket until it bottoms.
4. Insert the socket back into the headlight assembly. Turn it clockwise to lock it in place.
5. Turn on the lights to make sure the new bulb is working.
6. (Driver’s side)
Reinstall the coolant reserve tank.
Replacing a Parking Light/Front Side Marker Light Bulb
1. Open the hood.
To change the parking light/front side marker on the driver’s side, remove the fuse box fromits stay by pulling out.
2. Remove the socket from the headlight assembly by turning it one-quarter turn counterclockwise.
3. Pull the bulb straight out of its socket. Push the new bulb straight into the socket until it bottoms.
4. Insert the socket back into the headlight assembly. Turn it clockwise to lock it in place.
5. Turn on the lights to make sure the new bulb is working.
6. (Driver’s side)
Reinstall the fuse box in place securely.
Replacing Rear Bulbs
1. Open the tailgate. Place a cloth on the edge of the cover to prevent scratches. Remove the covers by carefully prying on the edge with a small flat-tip screwdriver.
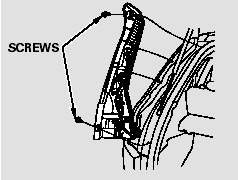
2. Use a Phillips-head screwdriver to remove the taillight assembly mounting screw under each cover.
3. Pull the taillight assembly out of the rear pillar.
4. Determine which of the four bulbs is burned out: stop/taillight, backup light, turn signal, or side marker.
5. Remove the socket by turning it one-quarter turn counterclockwise.
6. Pull the bulb straight out of its socket. Push the new bulb straight into the socket until it bottoms.
7. Reinstall the socket into the light assembly by turning it clockwise until it locks.
8. Turn on the lights to make sure the new bulb is working.
9. Align the clips on the taillight assembly with the holes in the body, then push the taillight assembly into place. Tighten the two mounting screws securely and reinstall the covers.
Replacing a High-mount Brake Light Bulb
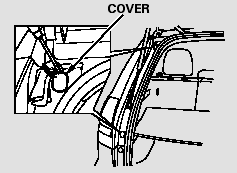
1. Open the tailgate.
Unlatch the top of the cover by pulling back on it with your hands.
2. Place a cloth on the side edge of the cover to prevent scratches.
Remove the cover by carefully prying on the edge with a small flat-tip screwdriver and pulling the cover off.
3. Remove the socket from the light assembly by turning it one-quarter turn counterclockwise.
4. Pull the bulb straight out of its socket. Push the new bulb straight into the socket until it bottoms.
5. Press the brake pedal to make sure the new bulb is working.
6. Put the socket back into the light assembly, and turn it clockwise to lock it in place.
7. Put the cover back on the light assembly. Push it in until it locks in place.
See also:
Rearview Camera
About Your Rearview Camera
Models without navigation system
The audio/information screen can display your vehicle’s rear view. The display
automatically changes to a rear view when the shift leve ...
Opening and Closing the Windows
Opening/Closing the Power Windows
The power windows can be opened and closed when the ignition switch is in ON
, using the switches on the doors.
The driver side switches can be used to open and c ...
Interior Lights
Interior Light Switches
ON
The interior lights come on regardless of whether the doors are open or closed.
Door activated
The interior lights come on in the following situations:
When any of th ...