


Audio/Information Screen
Displays the audio status and wallpaper. From this screen, you can go to various setup options.
■Switching the Display
Press the  (display) button to
change the display.
(display) button to
change the display.
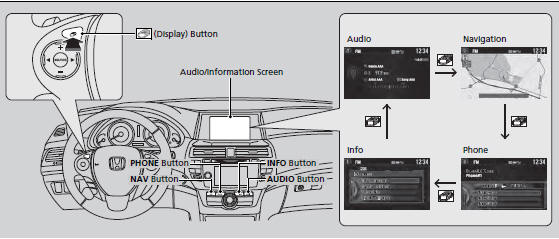
You can also use the AUDIO, NAV, PHONE and INFO buttons to go to the corresponding display.
■ Audio
Shows the current audio information.
■ Navigation
Shows the navigation screen.
■ Phone
Shows the HFL information.
■ Info
Shows the Trip Computer or Clock/Wallpaper and other information. Rotate
 to select an item, then press
  .
.
■ Trip computer (Current Drive)
Shows the range, and instant and average fuel economy of the current trip, as
well
as the average fuel economy from your last trip.
■ Trip computer (History of Trip A)
Shows the range, average fuel economy and distances traveled for the current
trip, as well
as the average fuel economy and distances traveled during the last three driving
cycles.
Each time you reset the trip meter A, the information on the display updates. The history of the previous three driving cycles is kept.
■ Deleting the history manually
1. Move on the History of Trip A screen to select Delete History, then press .
2. You will receive a confirmation message on the screen. Rotate
 to select Yes,
then press
to select Yes,
then press  .
.
■ Clock/Wallpaper
Shows a clock screen or an image you import.
■Wallpaper Setup
You can change, store, and delete the wallpaper on the audio/information screen.
■ Import wallpaper
You can import up to three images, one at a time, for wallpaper from a USB flash
drive.
1. Connect the USB flash drive to the USB
adapter cable.
2. Press the SETTINGS button.
3. Rotate to select System Settings,
then
press .
- Repeat the procedure to select Clock,
Clock/Wallpaper Type.
4. Move  to select Wallpaper.
- The screen will change to the wallpaper
list.
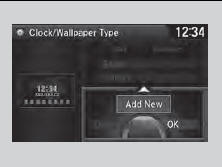
5. Move  to select Add New,
then press .
to select Add New,
then press .
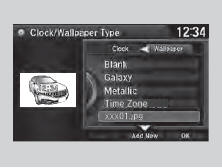
6. Rotate to select a desired
picture.
- The preview is displayed on the left side
on the screen.
7. Press , then move
 to select Start
Import.
to select Start
Import.
- The confirmation message will appear.
Then the display will return to the wallpaper list.
• When importing wallpaper files, the image must be in the USB flash drive’s root directory. Images in a folder cannot be imported.> • The file name must be fewer than 64 characters.> • The file format of the image that can be imported is BMP (bmp) or JPEG (jpg).> • The individual file size limit is 6 MB.> • The maximum image size is 1,680 x 936 pixels. If the image size is less than 420 × 234 pixels, the image is displayed in the middle of the screen with the extra area appearing in black.> • Up to 255 files can be selected.> • If the USB flash drive does not have any pictures, the No files detected message appears.
■ Select wallpaper
1. Press the SETTINGS button.
2. Rotate to select System
Settings, then press .
- Repeat the procedure to select Clock/Wallpaper Type.
3. Move to select Wallpaper.
- The screen changes to the wallpaper list.
4. Rotate to select a desired
wallpaper.
- The preview is displayed on the left side on the screen.
5. Press .
- The pop-up menu appears on the screen.
6. Rotate to select Set, then
press .
- The display will return to the wallpaper list.
■ Delete wallpaper
1. Press the SETTINGS button.
2. Rotate to select System Settings,
then press .
- Repeat the procedure to select Clock/Wallpaper Type.
3. Move to select Wallpaper.
- The screen changes to the wallpaper list.
4. Rotate to select a wallpaper that
you want to delete, then press .
- The preview is displayed on the left side on the screen.
5. Press .
- The pop-up menu appears on the screen.
6. Rotate to select Delete,
then press .
- The confirmation message will appear.
7. Rotate to select Yes, then
press to delete completely.
- The display will return to the wallpaper list.
From the pop-up menu, rotate to
select Preview
and press to see a preview at
full-size screen.
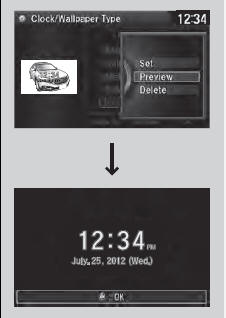
To go back to the previous screen, press
to select
OK, or press the BACK button.
When the file size is large, it takes a while to be previewed.
See also:
Technical Information
The diagrams in this section give you the dimensions and capacities of your vehicle
and the locations of the identification numbers. It also includes information you
should know about your vehicle ...
Windshield Wipers and Washers
Windshield Wiper
1. MIST
2. OFF
3. INT Intermittent
4. LO Low speed
5. HI High speed
6. Windshield washers
Push the right lever up or down to select a position.
MIST - The wipers run at high ...
VSA® (Vehicle Stability Assist), aka ESC (Electronic Stability Control), System
VSA® helps to stabilize the vehicle during cornering if the vehicle turns more
or less than what was intended. It also assists in maintaining traction on slippery
surfaces. It does so by regulating ...