


Operating the System
If you do not operate the  system from the front panel for more than 20 seconds, the indicator in the button
goes off, and the front display returns to what has previously been displayed.
system from the front panel for more than 20 seconds, the indicator in the button
goes off, and the front display returns to what has previously been displayed.
System Controls and Menus for DVD

Playing a DVD
Insert a DVD into the lower slot of the front audio unit.
The system automatically starts the DVD.
To fast forward, press and hold the
 (SKIP) bar, and to reverse, press and
hold the
(SKIP) bar, and to reverse, press and
hold the  bar on the front panel.
To go to the next chapter, press the
 bar, and to go to the
 beginning of the current chapter, press
the bar on the front panel. Quickly press the
beginning of the current chapter, press
the bar on the front panel. Quickly press the
 bar twice to go to the previous chapter.
Models without navigation system
Playing a DVD
DVD is available for the rear seat passenger only.
If you have turned off the Auto Play feature, press the
 (play) button on the front panel or
remote.
(play) button on the front panel or
remote.
DVD setup from the front panel
Press the  button on the front panel
while a DVD is playing and display REAR MENU in front. Rotate
button on the front panel
while a DVD is playing and display REAR MENU in front. Rotate
 to select DVD Setup, then press
 .
.
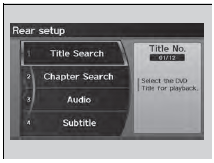
Setting up Audio:
1. Rotate to select Audio,
then press .
2. Rotate to select a language
for audio that is available on the DVD, then press
.
Setting up Subtitle:
1. Rotate to select Subtitle,
then press .
2. Rotate to select a subtitle
language that is available on the DVD.
Auto Play On:
1. Rotate to select Auto Play On,
then press .
2. The check mark disappears, and the auto play feature turns off.
With this feature off, the DVD does not automatically start playing when the
disc is inserted. Press button
to play.
Title/Chapter Search:
1. Rotate to select Title
Search or Chapter Search, then press
.
2. Rotate to select a title or chapter
number, then press .
Models with navigation system
Press the button on the front
panel while a DVD is playing. Rotate
to select DVD Setup, then press
.
Title/Chapter Search:
1. Rotate to select Title Search
or , then press .
2. Rotate to select a title or chapter
number, then press .
Setting up Audio:
1. Rotate to select Audio,
then press .
2. Rotate to select a language
for audio that is available on the DVD, then press
.
Setting up Subtitle:
1. Rotate to select Subtitle,
then press .
2. Rotate to select a subtitle language
that is available on the DVD.
Setting up Repeat:
1. Rotate to select Repeat,
then press .
2. Rotate to select the icon in
the center to repeat the current chapter, the icon on the right to repeat the current
title, or OFF to turn off repeat.
Auto Play:
1. Rotate to select Auto Play,
then press .
2. Rotate to select OFF
or ON, then press
.
With this feature off, the DVD does not automatically start playing when the
disc is inserted. Press button to play.
TITLE/SCROLL button on the remote
Press the TITLE/SCROLL button while the DVD is playing to see the current status of title, chapter, elapsed time, angle, subtitle, audio, and sound characteristics.
TITLE/SCROLL button on the remote
Press the TITLE/SCROLL button again to return.
MENU button on the remote
Press the MENU button while the DVD is playing to see the available options.
Use the  and
and
 buttons to highlight the option
and then press the ENT button.
buttons to highlight the option
and then press the ENT button.
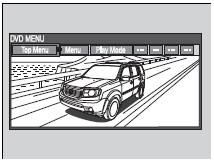
Top Menu:
The top page of the DVD’s title menu appears. The title menu also appears when you press the MENU button while the DVD is in the slot not playing. Press the CANCEL or MENU button to return.
Menu:
The DVD’s title menu appears.
Play Mode:
You can change the following three settings: Audio - Select a language for audio that is available on the DVD. The sound characteristics (Dolby Digital, LPCM, MPEG Audio, etc) of that audio is also displayed. Subtitle - Select a subtitle that is available on the DVD. Angle - Select a view angle that is available on the DVD. If the DVD currently playing does not carry multiple angles, only one option Angle 1 comes on. Press the CANCEL or MENU button to return.
Search:
You can search for a DVD segment from the following methods. Title Search - Select the title you want to play. Chapter Search - Select the chapter you want to play.
NumInput:
Enter a two digit number, if issued to the DVD, to find the segment you want to start to play.
1. Select NumInput to go to the number input screen.
2. Use the  ,
,
 ,
,
 , and
, and
 buttons to input numbers.
If you want to delete a number, select
DEL.
buttons to input numbers.
If you want to delete a number, select
DEL.
3. The cursor automatically goes to ENT after you input two digits. Press the ENT button to enter.
Repeat:
Highlight this option and press the ENT button to change the repeat mode from chapter repeat and title repeat, to repeat off.
SETUP button on the remote
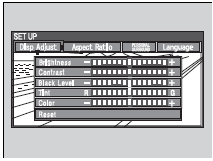
Press the SETUP button while the DVD is playing to see the available options.
Use the and
buttons to highlight the option and
then press ENT.
Disp Adjust:
You can adjust the overhead screen’s Brightness, Contrast, Black Level, Tint, and Color. To return to the default display setting, select Reset. After you make all the adjustments, the screen goes back to the top SETUP screen, or press the CANCEL button to return.
Aspect Ratio:
You can select the screen mode with a different aspect ratio from Normal, Wide, Zoom, and Full. After you select the mode, it takes about one second to return to the play mode with the selected ratio.
PERSONAL SURROUND:
You can select the sound effect mode that fits the DVD’s audio source from Music, Cinema, and Voice. Select Off to turn this feature off.
Language:
You can select the display language from English, French, and Spanish.
SETUP button on the remote
Some DVD formats do not allow for some of the setting adjustments.
When the DVD is not playing
Initial Settings -
Press the SETUP button to configure the initial Language, Dynamic Range, and Angle Mark settings before playing a DVD.
Language Settings:
Select the language for the DVD’s displayed menus (Menu Language), the DVD’s audio (Audio Language), and the DVD’s subtitle (Subtitle Language).
1. Select the language setting.
2. Select the language from English, French, Spanish, Arabic, German, Italian, Dutch, Chinese, Korean, Thai, Japanese, and other.
3. If you select other, you need to enter the four digit language code to configure the language that is not listed. Select Yes to go to the number input screen.
To return to the Language Settings screen, select No.
4. Press the ENT button each time you input a digit
- If you want to delete a number, select DEL.
5. The cursor automatically goes to ENT after you input four digits. Press the ENT button to command.
Dynamic Range:
This feature reduces the difference between the loud and quiet sound levels. Select ON or OFF.
Angle Mark:
You can select whether to display the angle mark appearing in the upper right corner of the screen when you change the view angle while the DVD is playing. Select ON or OFF.
SETUP button on the remote
Initial Settings:
The prior language varies by disc. You may not be able to configure your selected language setting.
System Controls and Menus for Audio
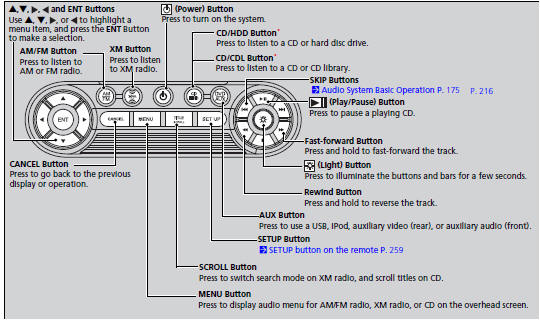
Playing AM/FM radio in the rear
Press the AM/FM button.
When you press the MENU button while the radio is playing, the audio menu appears on the overhead screen. The available functions are the same as those of the front audio system. The SKIP button on the control panel works the same as the SKIP bar on the front panel for AM/FM radio operation.
Playing XM radio in the rear
Press the XM button.
When you press the MENU button while the radio is playing, the audio menu appears on the overhead screen. The available functions are the same as those of the front audio system. The SKIP button on the control panel works the same as the SKIP bar on the front panel for XM radio operation.
To change the mode between category and channel, press and hold the TITLE/SCROLL button for five seconds.
System Controls and Menus for Audio
If you press the  button on the front
panel, you can operate the rear entertainment system from the front display.
button on the front
panel, you can operate the rear entertainment system from the front display.
Playing a CD, CD Library, and Hard disc drive
Press the CD/CDL or CD/HDD button.
The available options appear on the overhead screen are Repeat, Random, and Scan. These functions are the same as those of the front audio system.
To scroll your audio data title, press the TITLE/SCROLL button.
Playing iPod® and a USB flash drive
Press the AUX button.
The available options appear on the overhead screen are Repeat, Random, and Scan. These functions are the same as those of the front audio system.
To scroll your audio data title, press the TITLE/SCROLL button.
System Controls and Menus for Audio
You can also insert an audio CD compatible with the system, or recorded in MP3/WMA/AAC formats into the lower slot and play. The front passengers can listen to the same CD, or select another audio source.
See also:
Tools
Types of Tools
The tools were stored in the cargo area. ...
Turn Signals
The turn signals can be used when the ignition
switch is in ON .
■ One-touch turn signal
When you lightly push up or down and release
the turn signal lever, the exterior turn signals
and ...
Tire Service Life
The life of your tires is dependent on many factors, including driving habits,
road conditions, vehicle loading, inflation pressure, maintenance history, speed,
and environmental conditions (even wh ...