


HFL Menus
The ignition switch must be in ACCESSORY
 or ON
or ON
 to use HFL.
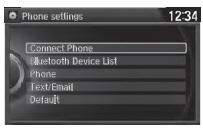
■ Phone Settings screen
1. Press the DISP button.
2. Rotate  to select Settings, then
press
to select Settings, then
press  .
.
3. Rotate  to select Phone Settings,
then
press
to select Phone Settings,
then
press  .
.
To use HFL, you must first pair your Bluetoothcompatible cell phone to the system while the vehicle is parked.
Some functions are limited while driving. A message appears on the screen when the vehicle is moving and the operation is canceled.
■ Phone screen
1. Press the DISP button.
2. Rotate  to select Phone,
then press
to select Phone,
then press  .
.
■Phone Setup
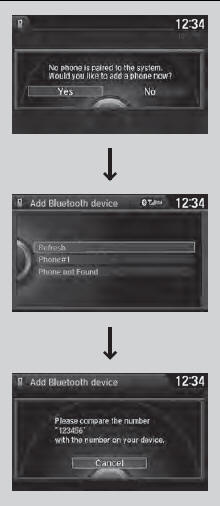
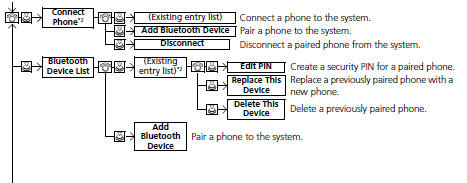
■ To pair a cell phone (when there is no
phone paired to the system)
1. Go to the Phone screen.
2. Rotate  to select Yes, then press
 .
.
3. Make sure your phone is search or
discoverable mode, then press .
.
- HFL automatically searches for a
Bluetooth device.
4. When your phone appears on the list, select
it by pressing  .
.
- If your phone does not appear, you can
select Refresh to search again.
- If your phone still does not appear, select
Phone Not Found and search for
Bluetooth devices using your phone.
From your phone, select
HandsFreeLink.
5. HFL gives you a pairing code on the audio/
information screen.
- Confirm if the pairing code on the screen
and your phone match.
This may vary by phone.
6. You will receive a notification on the screen
if pairing is successful.
Your Bluetooth-compatible phone must be paired to HFL before you can make and receive hands-free calls.
Phone Pairing Tips:
• You cannot pair your phone while the vehicle is
moving.
• Up to six phones can be paired.
• Your phone’s battery may drain faster when it is
paired to HFL.
• If your phone is not ready for pairing or not found
by the system within three minutes, the system will
time out and returns to idle.
Once you have paired a phone, you can see it displayed on the screen with one or two icons on the right side.
These icons indicate the following:
 : The phone can be used with HFL.
 : The phone is compatible with
Bluetooth® Audio.
: The phone is compatible with
Bluetooth® Audio.
When pairing is completed, an Automatic Phone Sync prompt appears. Select On if you want your call history and phonebook automatically imported to HFL.
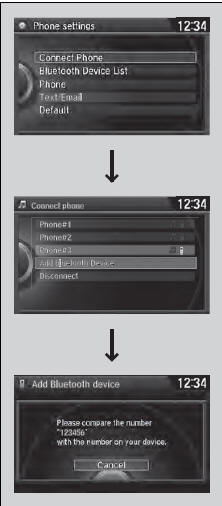
■ To pair a cell phone (when a phone has
already been paired to the system)
1. Go to the Phone Settings screen.
2. Rotate  to select Connect
Phone, then
press
to select Connect
Phone, then
press  .
.
- Repeat the procedure to select Add
Bluetooth Device.
3. Make sure your phone is in search or
discoverable mode, then press  .
.
- HFL automatically searches for a
Bluetooth device.
4. When your phone appears on the list, select
it by pressing  .
.
- If your phone does not appear, you can
select Refresh to search again.
- If your phone still does not appear, select
Phone Not Found and search for
Bluetooth devices using your phone.
From your phone, select
HandsFreeLink.
5. HFL gives you a pairing code on the audio/
information screen.
- Confirm if the pairing code on the screen
and your phone match.
This may vary by phone.
6. You will receive a notification on the screen
if pairing is successful.
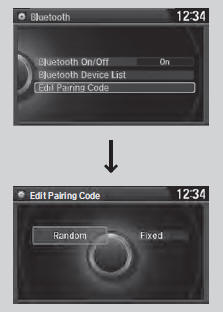
■ To change the pairing code setting
1. Press the DISP button.
2. Rotate  to select Settings, then
press
to select Settings, then
press  .
.
3. Rotate to select System
Settings, then
press
to select System
Settings, then
press  .
.
- Repeat the procedure to select
Bluetooth, then Edit Pairing Code.
4. Rotate to select Fixed or
Random,
then press
to select Fixed or
Random,
then press  .
.
The pairing code may be six or four digits depending on your phone.
The default pairing code is 0000 until you change the setting.
To create your own, select Fixed, and delete the current code, then enter a new one.
For a randomly generated pairing code each time you pair a phone, select Random.
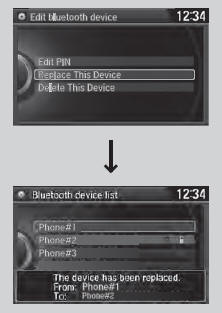
■ To replace an already-paired phone
with a new phone
1. Go to the Phone Settings screen.
2. Rotate  to select Bluetooth
Device List,
then press
to select Bluetooth
Device List,
then press  .
.
3. Rotate  to select a paired phone
you
want to replace, then press
to select a paired phone
you
want to replace, then press  .
.
4. Rotate to select Replace
This Device,
then press
to select Replace
This Device,
then press  .
.
5. HFL enters the pairing process and searches
a new phone.
- Follow the prompts to pair a new phone.
6. You will receive a notification on the screen
if pairing is successful.
The replaced phone will keep the same speed dial entries, call history, and security PIN information from the previously paired phone.
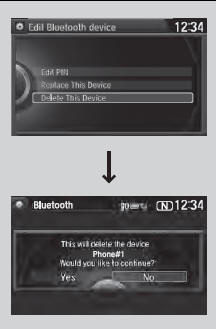
■ To delete a paired phone
1. Go to the Phone Settings screen.
2. Rotate  to select Bluetooth
Device List,
then press
to select Bluetooth
Device List,
then press  .
.
3. Rotate to select a phone you want
to
delete, then press
to select a phone you want
to
delete, then press  .
.
4. Rotate to select Delete
This Device,
then press
to select Delete
This Device,
then press  .
.
5. You will receive a confirmation message on
the screen. Rotate to select Yes,
then
press
to select Yes,
then
press  .
.
6. You will receive a notification on the screen
if it is successful.
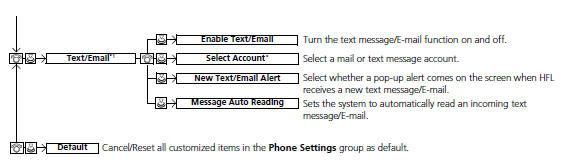
■To Set Up a Text Message/Email Options

■ To turn on or off the text/E-mail
function
1. Go to the Phone Settings screen.
2. Rotate to select Text/Email,
then press .
- Repeat the procedure to select Enable
Text/Email.
- A pop-up menu appears on the screen.
3. Rotate to select On or
Off, then press .
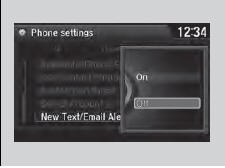
■ To turn on or off the text/E-mail notice
1. On the Text/Email screen, rotate
to
select New Text/Email Alert, then press
.
- A pop-up menu appears on the screen.
2. Rotate to select On or
Off, then press .
On: A pop-up notification comes on every time you
receive a new message.
Off: The message you receive is stored in the system
without notification.
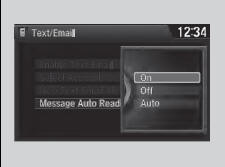
■ To set up the auto reading option
1. On the Text Message or the Text/Email
screen, rotate to select Message
Auto
Reading, then press .
- A pop-up menu appears on the screen.
2. Rotate to select On,
Off or Auto then
press .
On: A text message/Email is always read aloud.
Off: A text message/Email is not read aloud.
Auto: A text message/Email is read aloud only when
driving.
■To Create a Security PIN
You can protect each of the six cell phones with a security PIN.
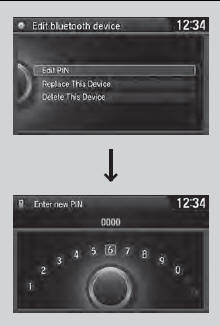
1. Go to the Phone Settings screen.
2. Rotate to select Bluetooth Device
List,
then press .
3. Rotate to select a phone you want
to
add a security PIN to, then press .
4. Rotate to select Edit PIN, then
press .
5. Enter a new four-digit number.
- Rotate to select, then press
Select to delete. Select OK to enter
the security PIN.
to delete. Select OK to enter
the security PIN.
6. Re-enter the four-digit number.
- The screen returns to the screen in step
4.
If the phone is already security PIN protected, you need to enter the current security PIN before clearing the PIN or creating a new one.
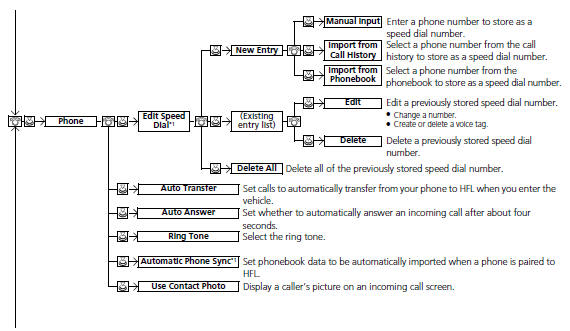
■Automatic Transferring
If you get into the vehicle while you are on the phone, the call can be automatically transferred to HFL.
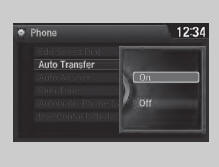
1. Go to the Phone Settings screen.
2. Rotate to select Phone,
then press .
- Repeat the procedure to select Auto
Transfer.
3. Rotate to select On, then
press .
■Auto Answer
You can set HFL to automatically answer an incoming call in four seconds.
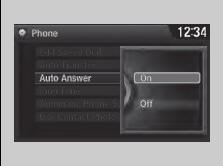
1. Go to the Phone Settings screen.
2. Rotate to select Phone,
then press .
- Repeat the procedure to select Auto
Answer.
3. Rotate to select On, then
press .
■Ring Tone
You can change the ring tone setting.
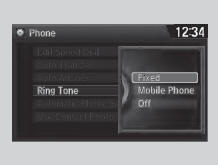
1. Go to the Phone Settings screen.
2. Rotate to select Phone,
then press .
- Repeat the procedure to select Ring
Tone.
3. Rotate to select Fixed,
Mobile Phone
or Off, then press .
Fixed: The fixed ring tone sounds from the speaker.
Mobile Phone: The ring tone stored in the
connected cell phone sounds from the speaker.
Off: No ring tones sound from the speaker.
■Automatic Import of Cellular Phonebook and Call History
■ When Automatic Phone Sync is set to
On:
When your phone is paired, the contents of its
phonebook and call history are automatically
imported to HFL.
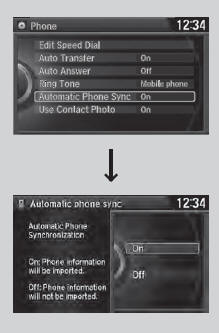
■ Changing the Automatic Phone Sync
setting
1. Go to the Phone Settings screen.
2. Rotate to select Phone,
then press .
- Repeat the procedure to select
Automatic Phone Sync.
3. Rotate to select On or
Off, then press .
When you select a person from the list in the cellular phonebook, you can see up to three category icons.
The icons indicate what types of numbers are stored for that name.
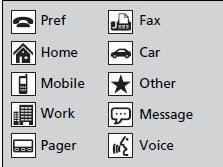
On some phones, it may not be possible to import the category icons to HFL.
The phonebook is updated after every connection.
Call history is updated after every connection or call.
■Speed Dial
Up to 20 speed dial numbers can be stored per phone.
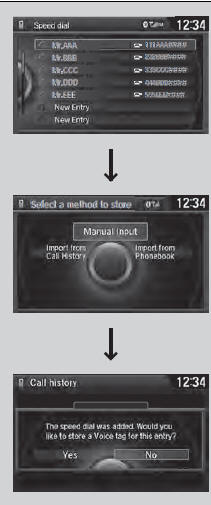
To store a speed dial number:
1. Go to the Phone screen.
2. Rotate to select Speed
Dial, then press
to select Speed
Dial, then press  .
.
- Repeat the procedure to select New
Entry.
3. Rotate to select a place to
choose a
number from, then press
to select a place to
choose a
number from, then press  .
.
From Import from Call History: - Select a number from the call history.
From Manual Input: - Input the number manually.
From Import from Phonebook: - Select a number from the linked cell phone’s imported phonebook.
4. When the speed dial is successfully stored,
you are asked to create a voice tag for the
number. Rotate to select Yes
or No,
then press
to select Yes
or No,
then press  .
.
5. Using the button, follow
the prompts to
store a voice tag for the speed dial entry.
button, follow
the prompts to
store a voice tag for the speed dial entry.
When a voice tag is stored, press the
button to
call the number using the voice tag. Say “Call” and
the voice tag name.
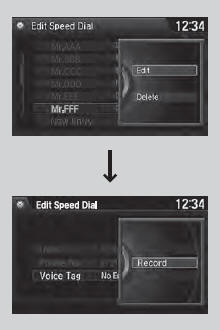
■ To add a voice tag to a stored speed
dial number
1. Go to the Phone Settings screen.
2. Rotate to select Phone,
then press
to select Phone,
then press  .
.
- Repeat the procedure to select Edit
Speed Dial.
3. Select an existing speed dial entry.
- From the pop-up menu, rotate  to
select Edit, then press
to
select Edit, then press  .
.
4. Rotate to select Voice
Tag, then press
to select Voice
Tag, then press  .
.
- From the pop-up menu, rotate to
select Record, then press
to
select Record, then press  .
.
5. Using the  button, follow the
prompts to
complete the voice tag.
button, follow the
prompts to
complete the voice tag.
Avoid using duplicate voice tags.
Avoid using “home” as a voice tag.
It is easier for HFL to recognize a longer name. For example, use “John Smith” instead of “John.”
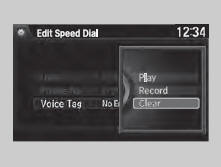
■ To delete a voice tag
1. Go to the Phone Settings screen.
2. Rotate to select Phone,
then press .
- Repeat the procedure to select Edit
Speed Dial.
3. Select an existing speed dial entry.
- From the pop-up menu, rotate to
select Edit, then press .
4. Rotate to select Voice
Tag, then press .
- From the pop-up menu, rotate to
select Clear, then press .
5. You will receive a confirmation message on
the screen. Rotate to select Yes,
then
press .
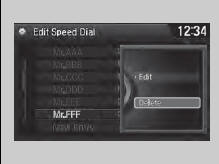
■ To delete a speed dial
1. Go to the Phone Settings screen.
2. Rotate to select Phone,
then press .
- Repeat the procedure to select Edit
Speed Dial.
3. Select an existing speed dial entry.
- From the pop-up menu, rotate to
select Delete, then press .
4. You will receive a confirmation message on
the screen. Rotate to select Yes,
then
press .
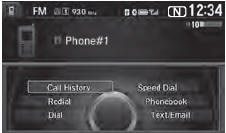
■Making a Call
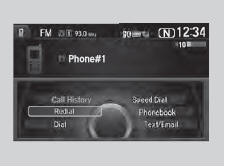
You can make calls by inputting any phone number, or by using the imported phonebook, call history, speed dial entries, or redial.
Any voice-tagged speed dial entry, phonebook name, or number can be dialed by voice from most screens.
Press the  button and say “Call” and
the voice tag
name, “Call by name” and the phonebook name, or
the phone number.
button and say “Call” and
the voice tag
name, “Call by name” and the phonebook name, or
the phone number.
The maximum range between your phone and vehicles is 30 feet (10 meters).
Once a call is connected, you can hear the voice of the person you are calling through the audio speakers.
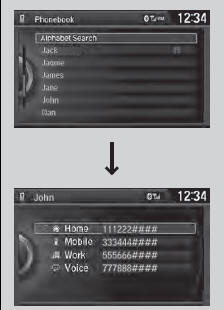
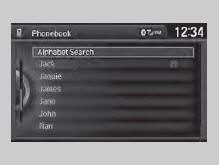
■ To make a call using the imported
phonebook
1. Go to the Phone screen.
2. Rotate to select Phonebook,
then
press
to select Phonebook,
then
press .
.
3. Rotate to select a name, then
press
to select a name, then
press  .
.
- You can also search by letter. Rotate
 to select Alphabet Search, then press
 .
.
4. Rotate to select a number, then
press
to select a number, then
press  .
.
- Dialing starts automatically.
This function is disabled while the vehicle is moving.
However, you can call a stored voice-tagged speed dial number using voice commands.
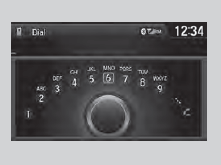
■ To make a call using a phone number
1. Go to the Phone screen.
2. Rotate to select Dial,
then press .
3. Rotate to select a number, then
press .
4. Rotate to select , then press
.
- Dialing starts automatically.
This function is disabled while the vehicle is moving.
However, you can call a stored voice-tagged speed dial number, phonebook name, or number using voice commands.
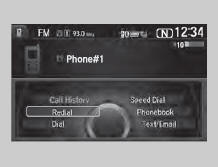
■ To make a call using redial
1. Go to the Phone screen.
2. Rotate to select Redial,
then press .
- Dialing starts automatically.
Press and hold the  button to
redial the last
number dialed in your phone’s history.
button to
redial the last
number dialed in your phone’s history.
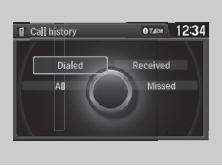
■ To make a call using the call history
Call history is stored by All, Dialed,
Received, and Missed.
1. Go to the Phone screen.
2. Rotate to select Call
History, then
press .
3. Rotate to select All,
Dialed, Received,
or Missed, then press .
4. Rotate to select a number, then
press .
- Dialing starts automatically.
The call history displays the last 20 dialed, received, or missed calls.
(Appears only when a phone is connected to HFL.)
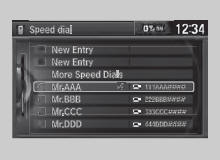
■ To make a call using a speed dial entry
1. Go to the Phone screen.
2. Rotate to select Speed
Dial, then press .
3. Rotate to select a number, then
press .
- Dialing starts automatically.
Select More Speed Dials to view another paired phone’s speed dial list. You can make a call from that list using the currently connected phone.
When a voice tag is stored, press the
 button to
call the number using the voice tag.
button to
call the number using the voice tag.
Any voice-tagged speed dial entry, phonebook name, or number can be dialed by voice from any screen.
Press the button and follow the
prompts.
■Receiving a Call
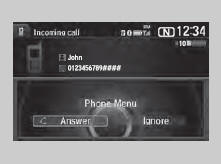
When there is an incoming call, an audible notification sounds (if activated) and the Incoming Call screen appears.
Press the  button to answer the
call.
button to answer the
call.
Press the  button to decline or end
the call.
button to decline or end
the call.
Call Waiting
Press the button to put the
current call on hold to
answer the incoming call.
Press the button again to return to
the current
call.
Ignore the incoming call if you do not want to answer it.
Press the button if you want to
hang up the
current call.
■Options During a Call
The following options are available during a call.
Mute: Mute your voice.
Transfer: Transfer a call from HFL to your phone.
Touch Tones: Send numbers during a call. This is useful when you call a menudriven phone system.
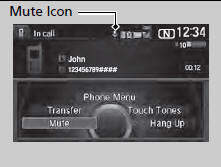
The available options are shown on the lower half of the screen.
Rotate to select the option, then
press
to select the option, then
press .
.
- The mute icon appears when Mute is
selected. Select Mute again to turn it off.
Touch Tones: Available on some phones.
■Receiving a Text Message/E-mail
HFL can display newly received text messages as well as 20 of the most recently received messages on a linked cell phone. Each received message can be read aloud and replied to using a fixed common phrase.
HFL can also display E-mails.
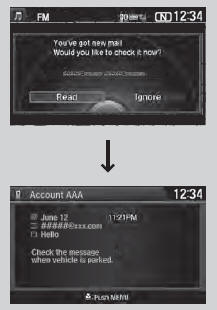
1. A pop-up appears and notifies you of a new
text message or E-mail.
2. Rotate  to select Read to
listen to the
message, then press
to select Read to
listen to the
message, then press  .
.
- The text message or E-mail is displayed. The system automatically starts
reading
out the message.
3. To discontinue the message read-out, press
 .
.
The system does not display any received messages while you are driving. You can only hear them read aloud.
With some phones, you may be able to display up to 20 most recent text messages and E-mails.
State or local laws may limit your use of the HFL text message/E-mail feature. Only use the text message/ E-mail feature when conditions allow you to do so safely.
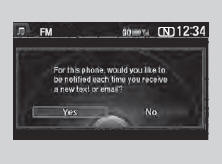
When you receive a text message or E-mail for the first time after the phone is paired to HFL, you are asked to turn the New Text/Email Alert setting to On.
■Selecting a Mail Account
If a paired phone has text message or mail accounts, you can select one of them to be active and receive notifications.
1. Go to the Phone Settings screen.
2. Rotate to select Text/Email,
then press
to select Text/Email,
then press  .
.
- Repeat the procedure to select Select
Account.
3. Rotat e to select Text
message or an
E-mail account you want, then press
e to select Text
message or an
E-mail account you want, then press  .
.
You can also select a mail account from the folder list screen or the message list screen.
Rotate to select Select
Account on the top of the
list, then press .
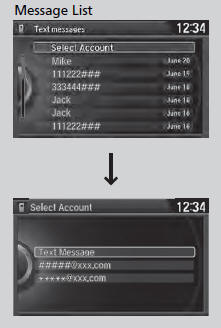
You can only receive notifications from one text message or mail account at a time.
■Displaying Messages
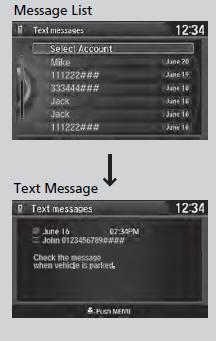
■ Displaying text messages
1. Go to the Phone screen.
2. Rotate  to select Text/Email,
then press .
to select Text/Email,
then press .
- Select account if necessary.
3. Rotate  to select a message,
then press .
to select a message,
then press .
- The text message is displayed. The
system automatically starts reading the
message aloud.
The  icon appears next to an
unread message.
icon appears next to an
unread message.
If you delete a message on the phone, the message is also deleted in the system. If you send a message from the system, the message goes to your phone’s outbox.
To see the previous or next message, press
on the
text message screen. From the pop-up menu, rotate
to select Previous Message or Next Message,
then press .
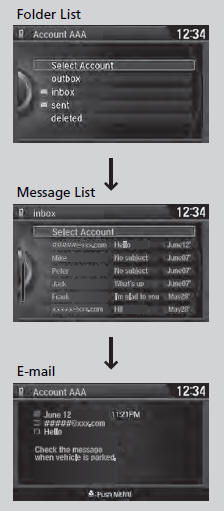
■ Displaying E-mails
1. Go to the Phone screen.
2. Rotate to select Text/Email,
then press .
- Select account if necessary.
3. Rotate to select a folder, then
press .
4. Rotate to select a message,
then press .
- The E-mail is displayed. The system
automatically starts reading the message
aloud.
Received text messages and E-mails may appear in the message list screen at the same time. In this case, text messages are titled No Subject.

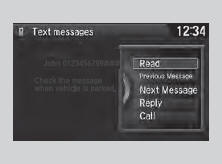
■ Using the Stop or Read option
1. Go to the text message or E-mail screen.
- The system automatically starts reading
the message aloud.
2. Press to have the pop-up menu
appear
on the screen.
3. Rotate to select Stop or
Read, then
press .
This option changes to:
• Stop while the text message/E-mail is read out.
Select this option to discontinue the message read
out.
• Read when the system has finished reading out the
text message/E-mail, or after you selected Stop.
Select this option to hear the system read out the selected message.
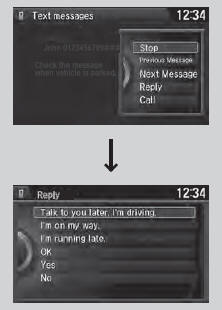
■ Reply to a message
1. Go to the text message or E-mail screen.
- The system automatically starts reading
the message aloud.
2. Pres s to have the pop-up menu
appear
on the screen.
3. Rotate to select Reply,
then press .
4. Rotate to select the reply
message, then
press .
- The pop-up menu appears on the screen.
5. Select Send to send the message.
- Complete appears on the screen when
the reply message was successfully sent.
The available fixed reply messages are as follows:
• Talk to you later, I’m driving.
• I’m on my way.
• I’m running late.
• OK
• Yes
• No
You cannot add, edit, or delete reply messages.
■ Making a call to a sender
1. Go to the text message screen.
- The system automatically starts reading
the message aloud.
2. Press to have the pop-up menu
appear
on the screen.
3. Rotate to select Call,
then press .
Models with navigation system
Bluetooth® HandsFreeLink® (HFL) allows you to place and receive phone calls using your vehicle’s navigation system, without handling your cell phone.
See also:
Handling the Unexpected
This chapter explains how to handle unexpected troubles. ...
Safe Driving
...
Automatic Transmission
Shift Lever Position Indicators
These indicators on the instrument panel show which position the shift lever
is in.
The ‘‘D’’ indicator comes on for a few seconds when you turn the ignit ...