


Setting the Clock
Clock
Models without navigation system
You can adjust the time in the clock display with the ignition switch is in
ON  .
.
Models with navigation system
The clock is automatically updated through the navigation system, so the time does not need to be adjusted.
Models without navigation system
These indications are used to show how to operate the selector knob or the MENU/SEL (Selector) knob.
Rotate  to select.
Press  to enter.
Models with audio touch screen
You can customize the clock display to show the 12 hour clock or 24 hour clock.
You can turn the clock display on and off.
Models without audio touch screen
■ Using the MENU button
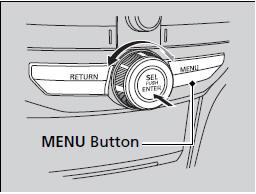
1. Press the MENU button.
2. Rotate  to select CLOCK
ADJUST in the
display.
to select CLOCK
ADJUST in the
display.
3. Press  . CLOCK ADJUST
appears.
. CLOCK ADJUST
appears.
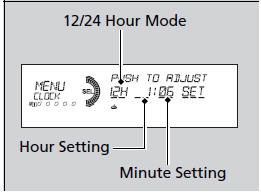
4. Rotate  to select the item you
want to
adjust (12/24 hour mode, hour, minute).
to select the item you
want to
adjust (12/24 hour mode, hour, minute).
Then press  .
.
5. Rotate  to make the adjustment.
6. Press  to enter your selection.
The display
returns to CLOCK ADJUST. Repeat steps 4
to 6 to adjust other items.
to enter your selection.
The display
returns to CLOCK ADJUST. Repeat steps 4
to 6 to adjust other items.
7. To enter the selection, Rotate  and select
SET, then press
and select
SET, then press  .
.
8. Press the MENU button to go back to the
normal display.
You can switch the clock display between 24 hours and 12 hours when in the menu mode.
Selector Knob Icon details
Rotate to select.
Press to enter.
To set the time to the nearest hour:
Press and hold the CLOCK button until the clock display begins to blink, then press the (6 (Reset) button.
Depending on the displayed time, the clock sets forward or backward.
Example:
1:06 will reset to 1:00
1:53 will reset to 2:00
■ Using the CLOCK button
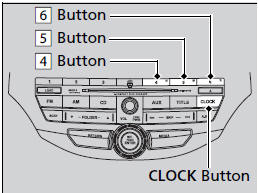
1. Press and hold the CLOCK button until the
clock display begins to blink.
2. Press the 4 (Hour) button to change the
hours.
3. Press the 5 (Minute) button to change the
minutes.
4. Press the CLOCK button to go back to the
normal display.
See also:
Power Steering Fluid Check
4-cylinder models
Specified fluid: Honda Power Steering Fluid
We recommend that you check the power steering fluid level every time you
refuel.
Check when the engine is not running.
1. Look ...
Customer Service Information
Honda dealership personnel are trained professionals.
They should be able to answer all your questions. If you encounter a problem
that
your dealership does not solve to your satisfaction, pleas ...
If the Brake System Indicator (Red) Comes On
■ Reasons for the indicator to come on
• The brake fluid is low.
• There is a malfunction in the brake system.
■ What to do when the indicator comes on while driving
Press the br ...