


Audio/Information Screen
Displays audio status, trip computer and wallpaper, and allows you to go to various setup options.
Switching the Display
Press DISPLAY button. Rotate  and
select the mode from the four display modes. Press
and
select the mode from the four display modes. Press
 .
.
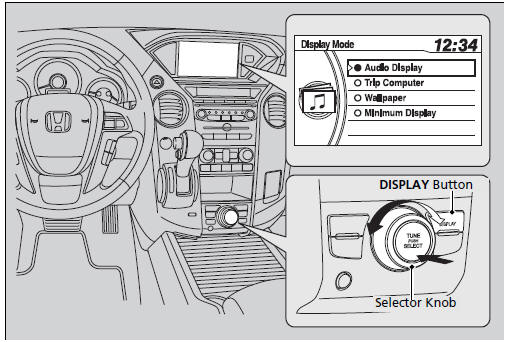
Switching the Display
These indications are used to show how to operate the selector knob.
Rotate  to select.
Press to enter.
Audio Display
Shows the current audio information.
Trip Computer
Shows the instant fuel economy, average fuel economy, distance (trip meter), average speed, elapsed time, and range.
Average speed
Shows the average speed in mph (U.S.) or km/h (Canada).
Elapsed time
Shows a clock screen or an image you import.
Minimum Display
Minimizes the display by only showing the compass, audio status, and clock on the upper part of the display.
Trip Computer
You can reset the trip computer.
Setting Options
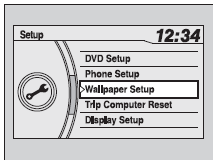
1. Press SETUP button.
2. Rotate  and select the setup option
you want to change. Press
and select the setup option
you want to change. Press  .
.
DVD Setup
Phone Setup
Wallpaper Setup
You can change, store, delete the wallpaper on the audio/information screen.
Models with navigation system
See the navigation system manual for how to change the wallpaper.
Importing pictures from USB
You can import up to five images, one at a time, for wallpaper from USB flash drive. Select Import picture from USB from setup menu and properly connect a USB flash drive to store an image.

1. Connect the USB flash drive to the adapter cable.
2.Press the SETUP button.
3.Rotate  to select Wallpaper
Setup, then press
to select Wallpaper
Setup, then press  .
.
4. Rotate to select Import picture
from USB, then press
.
5. Rotate to select a desired picture,
then press .
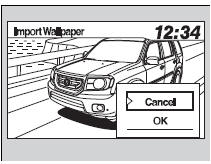
6.The preview of the imported data is displayed.
7.Rotate to select OK, then press
.
The imported list number and the confirmation message will appear. Then the display will return to the import wallpaper list.
Loading Picture will appear on the display.
Wallpaper Setup
When importing wallpaper files, the image must be in the USB flash drive’s root directory. Images in a folder cannot be imported.
The file format of the image that can be imported is BMP (bmp) or JPEG (jpg).
The maximum image size is 1,024 x 768 pixels. Smaller images are displayed in the middle of the screen with the extra area appearing in black.
If the USB flash drive does not have any pictures, No Files will appear.
Choose wallpaper
1. Rotate to select Choose
Wallpaper on the wallpaper setup menu, then press
.
The screen will change to the wallpaper list.
2. Rotate to select desired wallpaper
and press .
3.Your selection will be indicated by the filled in circle.
You can also select Default Wallpaper (Honda logo) or Clock on the list.
Delete wallpaper
1. Rotate to select Delete
Picture from mem on the wallpaper setup menu, then press
.
The screen will change to the delete wallpaper list.
2. Rotate to select
wallpaper that you want to delete and press
.
The confirmation message will appear.
3. Rotate to select Yes, then
press to delete completely .
Trip Computer Reset
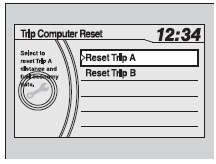
You can reset all data on the trip computer.
1. Press the SETUP button.
2. Rotate to select Trip Computer
Reset, then press .
3. Rotate to Trip A or Trip B, then
press .
The confirmation message will appear.
4. Rotate to select Yes, then press
to reset completely.
Display Setup
Brightness/Contrast
If you select Brightness or Contrast, adjust the setting by rotating
and pressing
.
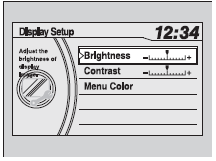
Menu Color
If you select Menu Color, rotate
to setting you want, then press
.

Language Selection
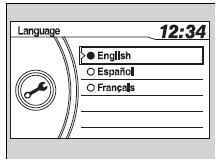
1.Rotate to select Language Selection,
then press .
2. Rotate to select the language,
then press .
See also:
Warranty Coverages
U.S. Owners
Your new vehicle is covered by these warranties:
New Vehicle Limited Warranty – covers your new vehicle, except for the
emissions control systems and accessories, against defects in m ...
Daytime Running Lights
The high beam headlights come on slightly dimmer than normal when the
following
conditions have been met:
• The ignition switch is in ON .
• The headlight switch is off, or in .
• The park ...
Brake Assist System
Designed to assist the driver by generating greater braking force when you
depress
the brake pedal hard during emergency braking.
■ Brake assist system operation
Press the brake pedal firml ...