


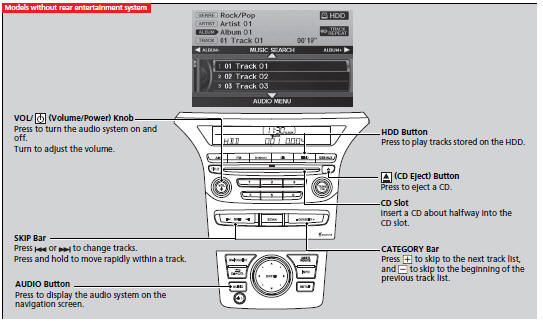
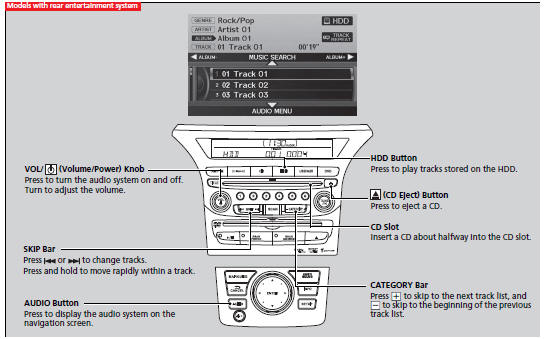
Playing Hard Disc Drive (HDD) Audio
The songs on music CDs can be recorded to the built-in HDD. You can then play the songs directly from your vehicle’s audio system.
Recording a Music CD to HDD
If the CD is played in the audio unit for the first time
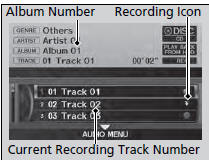
The songs on music CDs are automatically recorded to HDD by factory default.
The recording icon appears while the CD is being recorded.
Stopping recording
1. Move  to select AUDIO MENU.
2.Rotate  to select Cancel
Rec to HDD, then press
to select Cancel
Rec to HDD, then press  .
.
Recording a Music CD to HDD
You can store up to 9999 tracks.
The system supports the recording function from the standard CD-DA only.
The system does not support the CD-DA with copy protection. Gracenote® searches for the title information for the CD you have recorded to the HDD. If the information is found, song titles are displayed. If you turn off the ignition switch while recording a CD, there may be pauses between songs when you playback from the HDD. Forward/rewind, repeat, random and scan functions are not available during recording. You can listen to tracks from other album lists while recording. There is no compensation offered in the case of unsuccessful recording of audio data or the loss of audio data due to any cause whatsoever.
How to Select a Play Mode for HDD
You can select repeat, random, and scan modes when playing HDD.
1. Press the AUDIO button, move
to select AUDIO MENU.
2. Rotate to select Repeat,
Random, or Scan, then press .
3. Rotate to select a mode, then
press .
To turn off a play mode
1. Press the AUDIO button, move
to select AUDIO MENU.
2. Rotate to select Repeat, Random,
or Scan, then press .
3. Rotate to select OFF, then press
.
How to Select a Play Mode for HDD
Play Mode Menu Items
OFF
TRACK REPEAT: Repeats the current track.
TRACK SCAN: Samples all tracks on the HDD.
TRACK RANDOM: Plays all tracks on the HDD in random order.
HDD Setup
Recording a CD Manually
1. Press the AUDIO button, move
to select AUDIO MENU.
2. Rotate to select HDD Setup,
then press .
3.Rotate to select CD Recording,
then press .
4. Rotate to select MANUAL,
then press .
5. Move to select RETURN.
6. Rotate to select Rec to HDD.
Press .
To cancel recording, rotate to select
Cancel Rec to HDD. Press .
HDD Setup
HDD Setup menu items
CD Recording:
Gracenote Info. Update:
To update Gracenote® Album Info
1. Insert the update disc into the disc slot that includes the update.
2. Press the AUDIO button, move
to select AUDIO MENU.
3. Rotate to select HDD Setup.
4. Rotate to select Gracenote
Info. Update, then press .
5. Rotate to select USB or
DISC update source media, then press
.
6. Rotate to select Yes. Press to
start updating.
7. Rotate to select OK, on the confirmation
screen. Press .
To update Gracenote® Album Info
To acquire updated files:
Consult a dealer
US: Visit www.honda.com.
Canada: Visit www.honda.ca.
Once you perform an update, any information you edited before will be overwritten or erased.
Searching for Music
Search for music recorded to HDD using six different methods.
1. Press the AUDIO button, move
to select MUSIC SEARCH.
2. Rotate to select an item. Press
.
Move  or
or
 to select alphabetical tabs on some
screens.
to select alphabetical tabs on some
screens.
The first track begins playing.
Searching for Music
Albums, Artists, and Tracks display lists in alphabetical order. Ripped Date displays albums in chronological order.
You can also search for music on the HDD through voice commands using SBV.
RANDOM ALL TRACKS
Move to select RANDOM ALL TRACKS
to shuffle the playback of all tracks that have been recorded to HDD.
Adding a Track to a User Playlist
Add a track from any playlist to one of the six user playlists.
1. Press the AUDIO button, move
to select AUDIO MENU.
2. Rotate to select Add to
Playlist, then press .
3. Rotate to select a playlist.
Press .
The track is added to the end of the playlist.
Adding a Track to a User Playlist
The maximum number of songs in each of the six user playlists is 999. Adding new songs overwrites the oldest songs. Adding a track from a user playlist into the same user playlist will cause the track to appear twice in the playlist.
Editing a Playlist
Change the playlist name, track title, artist name, genre, and track order of the current playlist. You can also delete tracks, playlists, and albums.
1. Press the AUDIO button, move
to select AUDIO MENU.
2. Rotate to select Edit Music Info.,
then press .
3. Rotate to select an item.
Press .
Editing a Playlist
Deleting an album (original playlist) also deletes the album tracks you have stored in any user playlists. Deleting a user playlist or deleting all tracks from a user playlist does not remove the playlist folder. The folder retains the playlist name and artist information.
The following items are available, depending on the type of playlist:
Edit Artist Name: Enter a new artist name. Move
to select OK when finished. Then, select
whether to apply the new artist name to the album (playlist) and all tracks, the
current track only, all tracks, or the album (playlist) only.
Edit Playlist Name (user playlists): Enter a new playlist name. Move
to select OK when finished.
Edit Album Name (original playlists): Enter a new album name. Move
to select OK when finished.
Edit Track Name: Enter a new track name. Move
to select OK when finished.
Edit Genre: Select a new genre. Then select the original playlist to apply the genre.
Edit Track Order (user playlists): Select the track to move, and then
select the new location. Repeat to move more than one track. Move
to select OK when finished.
Delete Playlist: Deletes the user playlist. Rotate
to select at the
confirmation prompt to delete the playlist.
Delete Album: Deletes the original playlist. Rotate
to select Yes at the confirmation
prompt to delete the album.
Deletes the current track. Rotate
to select Yes at the confirmation
prompt to delete the current track.
Displaying Music Information
Display the music information (album name, artist name, genre) for an album (original playlist).

Gracenoter searches for the information of the currently selected album (original playlist).
1. Press the AUDIO button, move
to select AUDIO MENU.
2. Rotate to select Add to Get Music
Info., then press .
3. Rotate to select an album. Press
.
 The information is displayed.
Displaying Music Information
The maximum number of original playlists is 999 with a maximum of 99 songs in each playlist. Each album CD counts as an original playlist.
See also:
Locking/Unlocking the Doors from the Inside
■Using the Lock Tab
■ Locking a door
Pull the lock tab rearward.
■ Unlocking a door
Push the lock tab forward.
When you lock the door using the lock tab on the
driver’s d ...
Technical Information
The diagrams in this section give you the dimensions and capacities of your vehicle
and the locations of the identification numbers. It also includes information you
should know about your vehicle ...
Warranty Coverages
U.S. Owners
Your new vehicle is covered by these warranties:
New Vehicle Limited Warranty – covers your new vehicle, except for the
emissions control systems and accessories, against defects in m ...