


Headlight Bulbs
When replacing, use the following bulbs.
High beam headlight: 60W (HB3) Low beam headlight: 55 W (H11)
High Beam Headlight
Driver's side
1. Remove the clips using a flat-tip screwdriver, then remove the upper part of the air intake duct.
Driver and passenger side
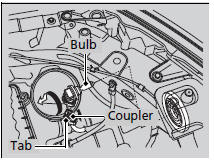
2. Push the tab to remove the coupler.
3. Rotate the old bulb to the left to remove.
4. Insert a new bulb into the headlight assembly and turn it to the right.
5. Insert the coupler into the connector of the bulb.
Headlight Bulbs
NOTICE
Halogen bulbs get very hot when lit. Oil, perspiration, or a scratch on the glass can cause the bulb to overheat and shatter. The headlight aim is set by the factory, and does not need to be adjusted. However, if you regularly carry heavy items in the cargo area or tow a trailer, have the aiming readjusted at a dealer or by a qualified technician. The HB3 and H11 types are halogen bulbs. When replacing a bulb, handle it by its base, and protect the glass from contact with your skin or hard objects. If you touch the glass, clean it with denatured alcohol and a clean cloth. The exterior lights' inside lenses (headlights, brake lights, etc.) may fog temporarily after a car wash or while driving in the rain. This does not impact the exterior light function. However, if you see a large amount of water or ice accumulated inside the lenses, have your vehicle inspected by a dealer.
Low Beam Headlights
Driver's side
1. Remove the clips using a flat-tip screwdriver, then remove the upper part of the air intake duct.
Driver and passenger side
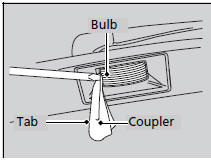
2. Push the tab to remove the coupler.
3. Rotate the old bulb to the left to remove.
4. Insert a new bulb into the headlight assembly and turn it to the right.
5. Insert the coupler into the connector of the bulb.
See also:
Fuse Locations
If any electrical devices are not working,
turn the ignition switch to LOCK
and
check to see if any applicable fuse is blown.
■Engine Compartment Fuse Box
Located near the brake fluid res ...
Fuel Economy
Improving Fuel Economy
Fuel economy depends on several conditions, including driving conditions,
your
driving habits, the condition of your vehicle, and loading. Depending on these
and
other co ...
Audio System Basic Operation
Models with navigation system
To use the audio system function, the ignition switch must be in ACCESSORY
or ON .
Use the interface dial or AUDIO button to access some audio functions.
Press t ...