


Service Station Procedures
Refueling
1. Park with the driver’s side closest to the service station pump.
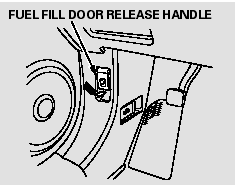
2. Open the fuel fill door by pulling on the handle located under the lower left corner of the dashboard.
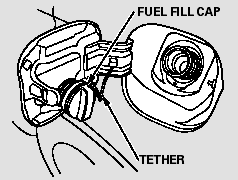
3. Remove the fuel fill cap slowly.
You may hear a hissing sound as pressure inside the tank equalizes.
The fuel fill cap is attached to the fuel filler with a tether. Place the cap in the holder on the fuel fill door.
4. Stop filling the tank after the fuel nozzle automatically clicks off. Do not try to ‘‘top off’’ the tank. This leaves some room in the fuel tank for the fuel to expand with temperature changes.
If the fuel nozzle keeps clicking off even though the tank is not full, there may be a problem with your vehicle’s fuel vapor recovery system. The system helps keep fuel vapor from going into the atmosphere. Try filling at another pump. If this does not fix the problem, consult your dealer.

Stop the engine, and keep heat, sparks, and flame away.
Handle fuel only outdoors.
Wipe up spills immediately.
Gasoline is highly flammable and explosive. You can be burned or seriously injured when handling fuel.
5. Screw the fuel fill cap back on until it clicks at least once. If you do not properly tighten the cap, the malfunction indicator lamp may come on. You will also see a ‘‘CHECK FUEL CAP’’ message on the information display.
6. Push the fuel fill door closed until it latches.
Check Fuel Cap Message
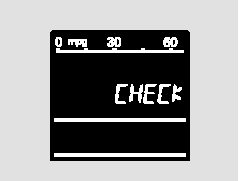
Your vehicle’s onboard diagnostic system will detect a loose or missing fuel fill cap as an evaporative system leak. The first time a leak is detected a ‘‘CHECK FUEL CAP’’ message appears on the information display.
Turn the engine off, and confirm the fuel fill cap is installed. If it is, loosen it, then retighten it until it clicks at least once. The message should go off after several days of normal driving once you tighten or replace the fuel fill cap. To scroll to another display, press the select/reset knob.
The ‘‘CHECK FUEL CAP’’ message will appear each time you restart the engine until the system turns the message off.
If the system still detects a leak in your vehicle’s evaporative emissions system, the malfunction indicator lamp (MIL) comes on. If the fuel fill cap was not already tightened, turn the engine off, and check or retighten the fuel fill cap until it clicks at least once. The MIL should go off after several days of normal driving once the cap is tightened or replaced. If the MIL does not go off, have your vehicle inspected by a dealer. For more information.
Opening and Closing the Hood

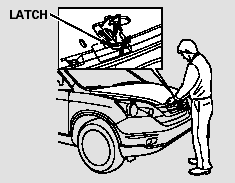
1. Park the vehicle, and set the parking brake. Pull the hood release handle located under the lower left corner of the dashboard.
The hood will pop up slightly.
2. Reach in between the hood and the front grille with your fingers.
The hood latch handle is above the ‘‘H’’ logo. Push this handle up until it releases the hood. Lift the hood.
If the hood latch handle moves stiffly, or if you can open the hood without lifting the handle, the mechanism should be cleaned and lubricated.
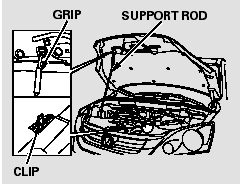
3. Holding the grip, pull the support rod out of its clip. Insert the end into the hole in the hood designated by an arrow.
To close the hood, lift it up slightly to remove the support rod from the hole. Put the support rod back into its holding clip. Lower the hood to about a foot (30 cm) above the fender, then let it drop. Make sure it is securely latched.
Oil Check
Wait a few minutes after turning the engine off before you check the oil.
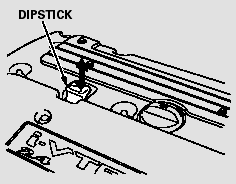
1. Remove the dipstick (orange handle).
2. Wipe off the dipstick with a clean cloth or paper towel.
3. Insert the dipstick all the way back into its hole.
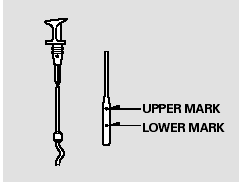
4. Remove the dipstick again, and check the level. It should be between the upper and lower marks.
If it is near or below the lower mark, see Adding Engine Oil.
Engine Coolant Check
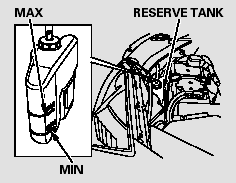
Look at the coolant level in the radiator reserve tank. Make sure it is between the MAX and MIN lines. If it is below the MIN line, see Adding Engine Coolant on page for information on adding the proper coolant.
See also:
Charging System Indicator
If the charging system indicator comes on brightly when the engine is running,
the battery is not being charged.
Immediately turn off all electrical accessories. Try not to use other electrically ...
Fastening a Seat Belt
After adjusting a front seat to the proper position, and while sitting
upright and well
back in the seat:
Adjusting the Seats
1. Pull the seat belt out slowly.
2. Insert the latch plat ...
Playing an iPod®
Connect the iPod® using your dock connector to the USB adapter cable, then press
the USB/AUX button.
How to Select a File from the iPod® Menu
1. Press the AUDIO button, move
to select MUS ...