


Playing Hard Disc Drive (HDD) Audio
The Hard Disc Drive (HDD) Audio function plays tracks from music CDs that have been recorded onto the built-in HDD. You can arrange the tracks in playlists or play the tracks using various search methods.
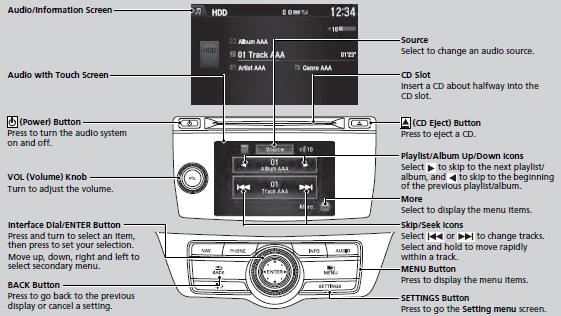
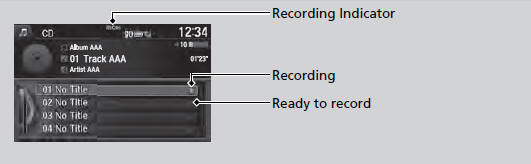
■Recording a Music CD to HDD
The songs on music CDs are automatically recorded by factory default to the HDD the first time you play each disc. You can then play the songs directly from the HDD.
You can add tracks to user playlists, where you can mix and match tracks from other CDs recorded on the HDD.
If you stop the engine or the power system is turned off while recording a CD, there may be pauses between songs when you play back from the HDD.
Repeat, random, and scan functions are not available during recording.
You can play music from other sources (e.g., XM, HDD, etc.) while recording.
Please note that there is no compensation offered in the case of unsuccessful recording of audio data or the loss of audio data due to any cause whatsoever.
Clearing the HDD Any music tracks stored on the HDD can be deleted.
■Stop Recording
1. Press the MENU button.
2. Rotate  to select Cancel
Record to HDD, then press
to select Cancel
Record to HDD, then press
 .
.
■Recording a CD Manually
1. Press the MENU button.
2. Rotate to select Rec to
HDD, then press .
Use this feature to set up the music search abilities when using Song By Voice™ (SBV) commands.
■How to Select a Track from the Music Search List
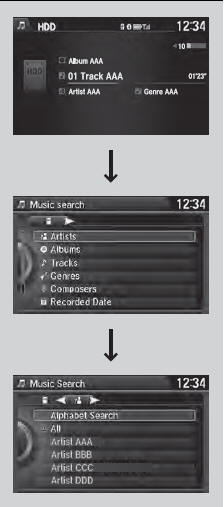
1. Press the MENU button.
2. Rotate to select Music
Search, then
press .
3. Rotate , move
 or
or
 , then press
to
select a track from the Music Search list.
, then press
to
select a track from the Music Search list.
- Title information is displayed if found in
the Gracenote® Album Info (Gracenote®
Media Database) stored on the HDD.
- The HDD has two types of playlists:
original playlists and user playlists. An
original playlist is automatically created
for each album when a music CD is
recorded. You can customize up to six
user playlists provided on the HDD by
adding tracks from your original playlists.
You can control the HDD audio using voice commands.
Music tracks recorded on HDD cannot be recorded onto CDs or other devices.
Tracks are recorded at four times the playback speed using ultra-efficient compression technology; therefore, sound quality may vary slightly from the original.
If the HDD is ever replaced, all music data is lost and cannot be recovered.
If there is a problem, you may see an error message on the display.
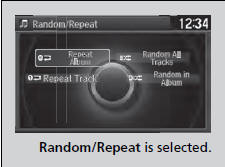
■How to Select a Play Mode
You can select scan, repeat, and random modes when playing a track.
Interface Dial
1. Press the MENU button.
2. Rotate to select Scan or
Random/
Repeat, then press .
3. Rotate to select a mode, then
press .
Audio with Touch Screen
1. Select More.
2. Select Scan or Random/Repeat.
3. Select a mode.
■ To turn off a play mode
Interface Dial
1. Press the MENU button.
2. Rotate to select the mode you
want to turn off, then press .
Audio with Touch Screen
1. Select More.
2. Select the mode you want to turn off.
Play Mode Menu Items
Scan
Scan Albums: Provides 10-second sampling of the
first track in each album.
Scan Tracks: Provides 10-second sampling of all
tracks on HDD.
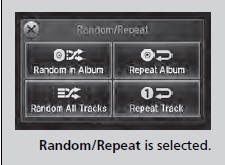
Random/Repeat
Repeat Album: Repeats all tracks in the current
album.
Repeat Track: Repeats the current track.
Random in Album: Plays all tracks in the current
album in random order.
Random All Tracks: Plays all tracks in random order.
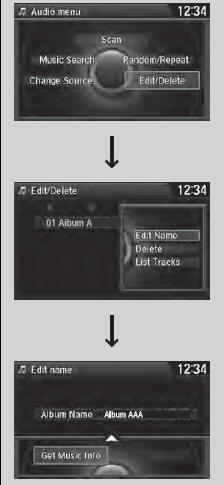
■Editing an Album or Playlist
Change the playlist name, album name, genre, and track order of the current playlist. You can also delete tracks, playlists, and albums.

■ Editing an album
1. Press the MENU button.
2. Rotate to select Edit/Delete,
then press .
3. Rotate to select Albums,
then press .
- The pop-up menu appears on the screen.
4. To edit an album name:
Rotate to select Edit name,
then press .
- Enter the name using the interface dial or
the audio with touch screen.
To delete an album:
Rotate to select Delete,
then press .
To edit track information or delete a track:
Rotate to select List
Tracks, then press .
The maximum number of songs in each of the six user playlists is 999. Adding new songs overwrites the oldest songs.
The maximum number of original playlists is 999 with a maximum of 99 songs in each playlist.
Each album CD counts as an original playlist. Adding a track from a user playlist into the same user playlist will cause the track to appear twice in the playlist.
Deleting an album (original playlist) also deletes the album tracks you have stored in any user playlists.
Deleting a user playlist or deleting all tracks from a user playlist does not remove the playlist folder.
The folder retains the playlist name and artist information.
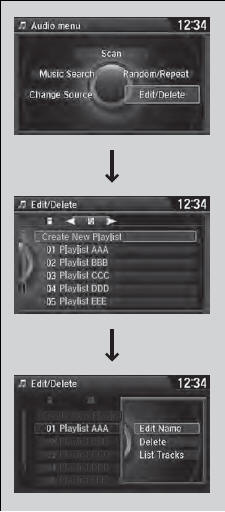
■ Editing a playlist
1. Press the MENU button.
2. Rotate to select Edit/Delete,
then press .
3. Rotate to select Playlists,
then press .
- The pop-up menu appears on the screen.
4. To edit a playlist name:
Rotate to select Edit name,
then press .
- Enter the name using the interface dial or
the audio with touch screen.
To delete a playlist:
Rotate to select Delete,
then press .
To edit track information or delete a track:
Rotate to select List
Tracks, then press .
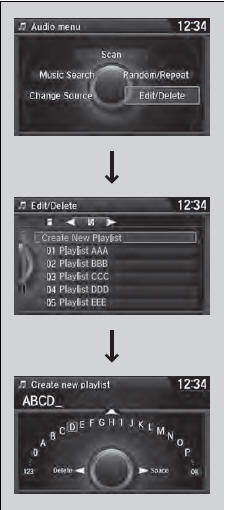
■ Creating a new playlist
1. Press the MENU button.
2. Rotate to select Edit/Delete,
then press .
3. Rotate to select Playlists,
then press .
4. Rotate to select Create
New Playlist,
then press .
- Enter the name using the interface dial or
the audio with touch screen, then select
tracks from the Music Search list.
■Editing Track Information
Change the track title, artist name, genre and composer. You can also delete tracks.
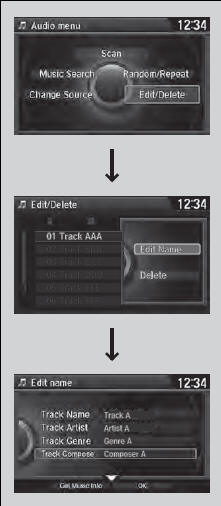
1. Press the MENU button.
2. Rotate to select Edit/Delete,
then press .
3. Rotate to select Tracks,
then press .
4. Rotate to select a track you want
to edit
or delete, then press .
- The pop-up menu appears on the screen.
5. To edit track information:
Rotate to select Edit name,
then press .
- Enter the track name, track artist, etc.
using the interface dial or the audio with
touch screen. Move  , rotate
to
select OK, then press .
, rotate
to
select OK, then press .
To delete a track:
Rotate to select Delete, then press
.
■Displaying Music Information
Music information (album name, artist name, genre) can be acquired by accessing the Gracenote® Album Info.
1. Press the MENU button.
2. Rotate to select Edit/Delete,
then press .
3. Rotate to select Albums,
then press .
4. Rotate to select an album you
want to
edit, then press .
- The pop-up menu appears on the screen.
5. Rotate to select Edit
name, then press .
6. Move to select Get
Music Info, then
press .
- The system starts to access the
Gracenote® Album Info.
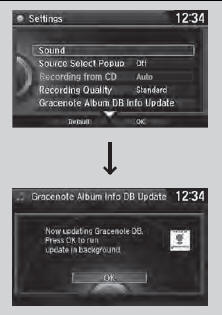
■Updating Gracenote® Album Info
Update the Gracenote® Album Info (Gracenote® Media Database) that is included with the navigation system.
1. Insert the update disc into the disc slot or
connect the USB flash drive that includes
the update.
2. Press the SETTINGS button in the HDD
mode.
3. Rotate to select Audio
Settings, then
press .
- Repeat the procedure to select
Gracenote Album DB Info Update.
4. Rotate to select Update
from CD or
Update from USB, then press
.
- The system starts updating and the
confirmation message appears on the
screen. Press to finish.
To acquire updated files:
• Consult a dealer.
• U.S.: Visit automobiles.honda.com.
• Canada: Visit www.hondanavi.ca.
Once you perform an update, any information you edited before will be overwritten or erased.
See also:
Recommended Engine Oil
• Genuine Honda Motor Oil
• Premium-grade 0W-20 detergent oil with an API Certification Seal on the
container.
Oil is a major contributor to your engine’s
performance and longevity. If y ...
A Few Words About Safety
Your safety, and the safety of others, is very important. And
operating this vehicle safely is an important responsibility.
To help you make informed decisions about safety, we have
provided oper ...
Recalling the Stored Position
1.Move the shift lever to .
2. Apply the parking brake.
3. Press a memory button ( or
) .
You will hear a beep, and the indicator light will blink.
The seat and the door mirrors will automatic ...