


Playing a USB Flash Memory Device (Canadian EX model and EX-L model without navigation system)
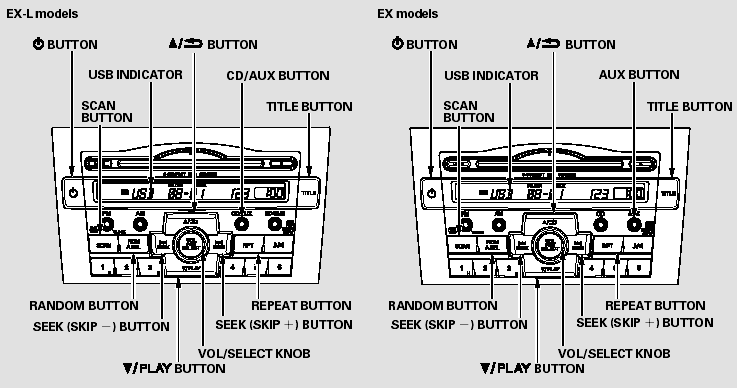
Playing a USB Flash Memory Device (Canadian EX model and EX-L model without navigation
system)
To Play a USB Flash Memory Device
This audio system can operate the audio files on a USB flash memory device with the same controls used for the in-dash disc changer. To play a USB flash memory device, connect it to the USB adapter cable in the upper glove box, then press the CD/ AUX or AUX button.
The audio system reads and plays the audio files on the USB flash memory device in MP3, WMA or AAC* formats. Depending on the format, the display shows MP3, WMA or AAC when a USB flash memory device is playing. The USB flash memory device limit is up to 700 folders or up to 65535 files.
*: Only AAC format files recorded with iTunes are playable on this audio unit.
The recommended USB flash memory devices are 256 MB or higher, and formatted with the FAT file system. Some digital audio players may be compatible as well.
Some USB flash memory devices (such as devices with security lockout features, etc.) will not work in this audio unit.
NOTE:
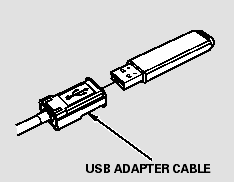
Do not use an extension cable to the USB adapter cable equipped with your vehicle.
Do not connect your USB flash memory device using a hub.
Do not use a device such as a card reader or hard drive as the device or your files may be damaged.
Do not keep a USB flash memory device in the vehicle. Direct sunlight and high heat will damage it.
We recommend backing up your data before playing a USB flash memory device.
Some devices cannot be powered or charged via the USB adapter. If this is the case, use the accessory adapter to supply power to your device.
Depending on the software the files were made with, it may not be possible to play some files, or display some text data.
Depending on the type and number of files, it may take some time before they begin to play.
The specifications for compatible MP3 files are:
Sampling frequency:
32/44.1/48 kHz (MPEG1)
16/22.05/24 kHz (MPEG2)
Bitrate:
32/40/48/56/64/80/96/112/128/160/192/224/256/320/VBR kbps (MPEG1)
8/16/24/32/40/48/56/64/80/96/112/128/144/160/VBR kbps (MPEG2)
Supported standards:
MPEG1 Audio Layer3
MPEG2 Audio LSF Layer3
Partition: Top partition only
Maximum layers: 8
The specifications for compatible WMA files are:
Sampling frequency:
32/44.1/48 kHz
Bitrate:
48 - 320/VBR kbps (Max 384)
Supported standards:
WMA version 7/8/9
Maximum layers: 8
Partition: Top partition only
The specifications for compatible AAC files are:
Sampling frequency:
8/11.025/12/16/22.05/24/32/44.1/48 kHz
Bitrate:
8 - 320 kbps
Supported standards:
MPEG4/AAC LC
MPEG2/AAC LC
Partition: Top partition only
Maximum layers: 8

Combining a low sampling f requency with a low bitrate may result in extremely degraded sound quality.
NOTE:
In WMA or AAC format, DRM (digital rights management) files cannot be played. If the system finds a DRM file, the audio unit displays UNPLAYABLE FILE, and then skips to the next file.
Connecting a USB Flash Memory Device
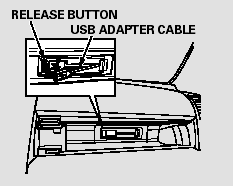
1. Open the upper glove box.
2. Push the release button to release the USB adapter cable.
3. Connect the USB flash memory device to the USB connector correctly and securely.
When the USB flash memory device is connected, the USB indicator is shown in the display.
Text Data Display Function
Each time you press the TITLE button, the display mode shows you in sequence, the folder name, the file name, the artist name, the album name, the song name, or name off (which turns off the text display).
The display shows up to 16 characters of the selected data. If the text data has more than 16 characters, you will see the first 15 characters and the > indicator in the display. Press and hold the TITLE button until the next 16 characters are shown.
FOLDER SELECTION - To select a different folder, press the
 button or
 button.
Press the button to skip to the
next folder, and press the button
to skip to the beginning of the previous folder.
To Change or Select Files
Use the SKIP button while a USB flash memory device is playing to change files.
SKIP - Each time you press the
 (SKIP +) button, the system skips
forward to the beginning of the next file. Press the
(SKIP +) button, the system skips
forward to the beginning of the next file. Press the
 (SKIP -) button, to skip backward
to the beginning of the current file. Press it again to skip to the beginning of
the previous file.
(SKIP -) button, to skip backward
to the beginning of the current file. Press it again to skip to the beginning of
the previous file.
To move rapidly within a file, press and hold either side (
or ) of the SKIP button.
To Select a File from Folder and File Lists
You can also select a folder or file by using the VOL/SELECT knob. Push the VOL/SELECT knob to switch the display to the folder or file list, then turn the VOL/SELECT knob to select a folder or file. Press the VOL/SELECT knob to set your selection.
Pressing the  button goes back to
the previous display and pressing the TITLE button cancels this setting mode.
button goes back to
the previous display and pressing the TITLE button cancels this setting mode.
To Select Repeat, Random or Scan Mode:
You can select any type of repeat, random and scan modes by using the RPT button, RDM button, or SCAN button.
REPEAT - This feature continuously plays a file. To activate the repeat feature, press the RPT button. You will see ‘‘RPT’’ in the display. To turn it off, press and hold the RPT button.
FOLDER REPEAT - This feature replays all the files in the selected folder in the order they are stored.
To activate the folder repeat feature, press the RPT button repeatedly.
You will see ‘‘F-RPT’’ in the display.
To turn it off, press and hold the RPT button.
Each time you press and release the RPT button, the mode changes from file repeat to folder repeat, then to normal play.
RANDOM - This feature plays all the files in random order. To activate the track random feature, press the RDM button. You will see ‘‘RDM’’ in the display. To turn it off, press and hold the RDM button.
FOLDER RANDOM - This feature plays the files in the current folder in random order. To activate the folder random feature, press the RDM button repeatedly. You will see ‘‘F-RDM’’ in the display. To turn it off, press and hold the RDM button.
Each time you press the RDM button, the mode changes from track random, play to folder random play, then to normal play.
SCAN - This feature samples all files in the current folder in the order they are stored. To activate the scan feature, press the SCAN button. You will see ‘‘SCAN’’ in the display. You will get a 10 second sampling of each file in the folder.
Press and hold the SCAN button to get out of the scan mode and play the last file sampled.
FOLDER SCAN - This feature samples the first file in each folder in the order they are stored. To activate the folder scan feature, press the SCAN button repeatedly.
You will see ‘‘F-SCAN’’ in the display.
You will get a 10 second sampling of the first file in each folder. Press and hold the SCAN button to get out of the folder scan mode and play the last file sampled.
Each time you press and release the SCAN button, the mode changes from file scan to folder scan, then to normal play.
To Stop Playing a USB Flash Memory Device
To play the radio when a USB flash memory device is playing, press the FM, AMor XMbutton. If a disc is in the audio unit, press the CD/AUX or CD button to play the disc.
Disconnecting a USB Flash Memory Device
You can disconnect the USB flash memory device at any time even if the USB mode is selected on the audio system. Always follow the USB flash memory device’s instructions when you remove it.
When you disconnect the USB flash memory device while it is playing, the display shows ‘‘NO DATA.’’
If you reconnect the same USB flash memory device, the system will begin playing where it left off.
USB Flash Memory Device Error Messages
If you see an error message on the audio display while playing a USB flash memory device, find the solution in the chart to the right. If you cannot clear the error message, take your vehicle to your dealer.
See also:
Playing the AM/FM Radio (EX-L model with navigation system)
...
Cleaning the Seat Belts
Dirt build-up in the loops of the seat belt anchors can cause the belts to retract
slowly. Wipe the insides of the loops with a clean cloth dampened in mild soap and
warm water or isopropyl alco ...
Checking the Battery
Check the battery condition monthly. Look at
the test indicator window and check the
terminals for corrosion.
If your vehicle’s battery is disconnected or goes dead:
• The audio system is di ...