


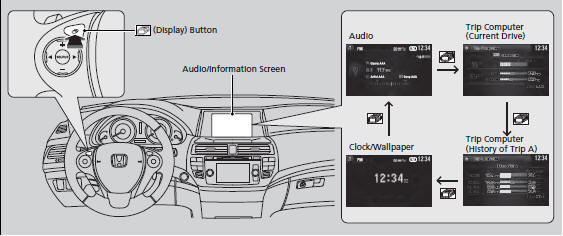
Audio/Information Screen
Displays the audio status and wallpaper. From this screen, you can go to various setup options.
■Switching the Display
Using the  button
Press the (display)
button to change the display.
Using the DISP button
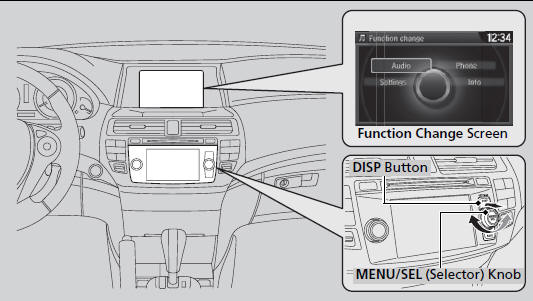
Press the DISP button to go to the Function Change screen.
Rotate  to select Audio,
Phone, Info or Settings and press
to select Audio,
Phone, Info or Settings and press
 .
.
■ Audio
Shows the current audio information.
■ Phone
Shows the HFL information.
■ Settings
Enters the customizing menu screen.
■ Info
Shows the Trip Computer or Clock/Wallpaper information.
Press , rotate
to select an item, then press .
Info menu items
Current Drive (Trip computer)
Shows the range, and instant and average fuel economy of the current trip, as
well
as the average fuel economy from your last trip.
History of Trip A (Trip computer)
Shows the range, average fuel economy and distance traveled for the current
trip,
as well as the average fuel economy and distances traveled during the last three
driving cycles.
Each time you reset the trip meter A, the information on the display updates. The history of the previous three driving cycles is kept.
Delete History
1. Rotate to select Delete
History, then press .
2. You will receive a confirmation message on the screen. Rotate
to select Yes,
then press .
Clock/Wallpaper
Shows the current clock type and wallpaper
Clock/Wallpaper Change
Enters the clock and wallpaper setting menu screen.
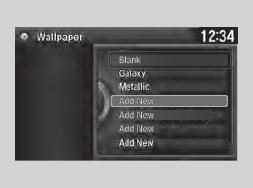
■Wallpaper Setup
You can change, store, and delete the wallpaper on the audio/information screen.
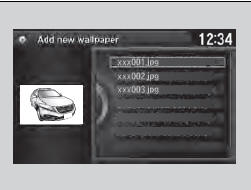
■ Import wallpaper
You can import up to three images, one at a time, for wallpaper from a USB flash
drive.
1. Connect the USB flash drive to the USB
adapter cable
2. Press the DISP button to go to the
Function change screen.
3. Rotate  to select Info,
then press
to select Info,
then press  .
.
- Repeat the procedure to select Clock/
Wallpaper Change, Clock/Wallpaper
Type, then Wallpaper.
4. Rotate  to select Add
New, then press
to select Add
New, then press  .
.
- The picture name is displayed on the list.
5. Rotate  to select a desired
picture.
to select a desired
picture.
- The preview is displayed on the left side
on the screen.
6. Press  to save the data.
- The confirmation message will appear.
Then the display will return to the wallpaper list.
• When importing wallpaper files, the image must be
in the USB flash drive’s root directory. Images in a folder cannot be
imported.
• The file name must be fewer than 64 characters.
• The file format of the image that can be imported
is BMP (bmp) or JPEG (jpg).
• The individual file size limit is 2 MB.
• The maximum image size is 1,680 x 936 pixels. If
the image size is less than 420 × 234 pixels, the
image is displayed in the middle of the screen with
the extra area appearing in black.
• Up to 255 files can be selected.
• If the USB flash drive does not have any pictures,
the No files detected message appears.
You can also enter the wallpaper setup menu screen to select Settings, Info Settings, then Clock/ Wallpaper Type.
■ Select wallpaper
1. Press the DISP button to go to the Function change
screen.
2. Rotate  to select Info, then
press
to select Info, then
press  .
.
- Repeat the procedure to select Clock/Wallpaper change, Clock/Wallpaper
Type, then Wallpaper.
- The screen changes to the wallpaper list.
3. Rotate  to select a desired
wallpaper.
to select a desired
wallpaper.
- The preview is displayed on the left side on the screen.
4. Press  .
.
- The pop-up menu appears on the screen.
5. Rotate  to select Set,
then press
to select Set,
then press  .
.
- The display will return to the wallpaper list.
■ Delete wallpaper
1. Press the DISP button to go to the Function change
screen.
2. Rotate to select Info, then
press .
- Repeat the procedure to select Clock/Wallpaper change, Clock/Wallpaper
Type, then Wallpaper.
- The screen changes to the wallpaper list.
3. Rotate to select a wallpaper
that you want to delete.
- The preview is displayed on the left side on the screen.
4. Press .
- The pop-up menu appears on the screen.
5. Rotate to select Delete,
then press .
- The confirmation message will appear.
6. Rotate to select OK,
then press to delete completely.
- The display will return to the wallpaper list.
From the pop-up menu, rotate to
select Preview
and press to see a preview at
full-size screen.

To go back to the previous screen, press
o select
OK, or press the BACK button.
When the file size is large, it takes a while to be previewed.
See also:
Tire Pressure Monitoring System (TPMS)
● TPMS monitors tire pressure.
● TPMS is turned on automatically every
time you start the engine. ...
Rear Window Defogger
The rear window defogger will clear fog, frost, and thin ice from the window.
Push the defogger button to turn it on and off. The indicator in the button comes
on to show the defogger is on. It ...
Vehicle Identification Number (VIN)
Your vehicle has a 17-digit vehicle identification number (VIN) used to
register your
vehicle for warranty purposes, and for licensing and insuring your vehicle. See
the
image below for the VIN ...