


Playing Discs (EX and EX-L models without navigation system)
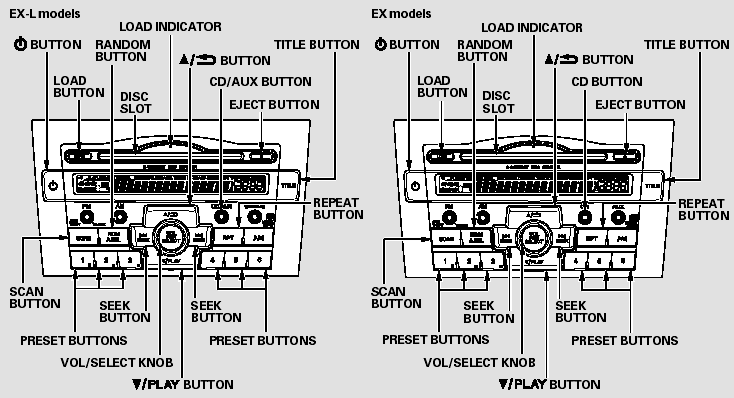
Playing Discs (EX and EX-L models without navigation system)
To Play a Disc
To load or play discs, the ignition switch must be in the ACCESSORY (I) or ON (II) position.
You operate the disc changer with the same controls used for the radio.
To select the disc changer, press the CD button (CD/AUX button on models with satellite radio), the disc and track numbers are displayed.
The system will continuously play a disc until you change modes.

Do not use discs with adhesive labels.
The label can curl up and cause the disc to jam in the unit.
This audio system can also play CD-Rs and CD-RWs compressed in MP3 or WMA formats. The numbers of the folder and track playing are shown in the display on the disc player. A disc can support up to 255 folders, and each folder can hold up to 255 playable files. A disc can hold up to 999 files in total.
When there are more than 99 folders in a disc, the audio display only shows two digits.
NOTE:
If a file on an MP3 or WMA disc is protected by digital rights management (DRM), the audio unit displays UNSUPPORTED, and then skips to the next file.
Video CDs and DVDs do not work in this unit.
The specifications for compatible MP3 files are:
Sampling frequency:
32/44.1/48 kHz (MPEG1)
16/22.05/24 kHz (MPEG2)
Bitrate:
32/40/48/56/64/80/96/112/128/160/192/224/256/320 kbps (MPEG1)
8/16/24/32/40/48/56/64/80/96/112/128/160 kbps (MPEG2)
Compatible with variable bitrate and multi-session
Supported standards:
MPEG1 Audio Layer3
MPEG2 Audio Layer3
Number of layers (including ROOT): Over 8 layers
The specifications for compatible WMA files are:
Sampling frequency:
32/44.1/48 kHz
Bitrate:
48/64/80/96/128/160/192 kbps
Compatible with variable bitrate and multi-session
Supported standards:
WMA version 7/8/9
Number of layers (including ROOT): Over 8 layers
Loading Discs in the In-dash Disc Changer
Your vehicle’s in-dash disc changer holds up to six discs.
1. Press the LOAD button until you hear a beep and see ‘‘LOAD’’ on the display.
To load only one CD, press and release the LOAD button.
2. The disc number for an empty position is highlighted and the red disc load indicator starts blinking.
3. Insert the disc into the disc slot when the green disc load indicator comes on. Insert it only about halfway; the drive will pull it in the rest of the way. You will see ‘‘BUSY’’ in the display while the disc load indicator turns red and blinks as the disc is loaded.
You cannot load and play 3-inch (8-cm) discs in this system.
4. When the disc load indicator turns green and ‘‘LOAD’’ appears in the display again, insert the next disc in the slot. Do not try to insert a disc until ‘‘LOAD’’ appears. You could damage the audio unit.
5. Repeat this until all six positions are loaded. If you are not loading all six positions, the system begins playing the last disc loaded.
You can also load a disc into an empty position while a disc is playing by pressing the appropriate preset button. The system stops playing the current disc and starts the loading sequence. It then plays the disc just loaded.
Text Data Display Function
Each time you press the TITLE button, the display shows you the text, if the disc was recorded with text data.
You can see the album, artist, and track name in the display. If a disc is recorded in MP3 or WMA, you can see the folder and file name, and the artist, album, and track tag.
With the folder name, you will see the FOLDER indicator in the display.
The TRACK indicator is shown with the file or track name.
The display shows up to 16 characters of selected text data (the folder name, file name, etc.).
If the text data has more than 16 characters, you will see the first 15 characters and the > indicator on the display. Press and hold the TITLE button until the next 16 characters are shown. You can see up to 31 characters of text data.
If you press and hold the TITLE button again, the display shows the first 15 characters again.
If any letter is not available, it is replaced with ‘‘ . ’’ (dot) in the display.
When the disc has no text data, you will see ‘‘NO INFO’’ on the display.
You will also see some text data under these conditions:
When a new folder, file, or track is selected.
When you change the audio mode to play a disc with text data or in MP3 or WMA.
When you insert a disc, and the system begins to play.
When playing a CD-DA with text data, the album and track name are shown in the display.With a disc in MP3 or WMA, the display shows the folder and file name.
To select a different disc, press the appropriate preset button (1 - 6). If you select an empty position in the disc changer, the system will try to load the disc in the next available slot.
To Change or Select Tracks/Files
You can use the SEEK button while a disc is playing to change tracks (files in MP3/WMA mode).
In MP3/WMA mode, use the  or
or
 button to select folders in the disc,
and use the SEEK button to change files.
button to select folders in the disc,
and use the SEEK button to change files.
SEEK/SKIP - Each time you press and release the
 side, the player skips forward to
the beginning of the next track (files in MP3/WMA mode). Press and release the
side, the player skips forward to
the beginning of the next track (files in MP3/WMA mode). Press and release the
 side to skip backward to the beginning
of the current track. Press it again to skip to the beginning of the previous track.
side to skip backward to the beginning
of the current track. Press it again to skip to the beginning of the previous track.
To move rapidly within a track, press and hold the
, or the
button.
You can also operate the track selection by using the VOL/SELECT knob. Press the VOL/SELECT knob and you will see ‘‘SEL’’ in the display.
Turn the knob to switch the track number. Press the VOL/SELECT knob or
 button to set your selection. To turn
it off, press the
button to set your selection. To turn
it off, press the  button.
In MP3 or WMA mode
FOLDER SELECTION - To select a different folder, press the
or
button. Press the
button to skip to the next folder,
and the button to skip to the previous
folder.
You can also operate the folder and file selection by using the VOL/ SELECT knob.
Press the VOL/ SELECT knob and you will see SEL in the display, Turn the knob to
switch the folder number and press the knob to set your selection. To turn it off,
press the button repeatedly.
REPEAT (TRACK/FILE REPEAT) - To continuously replay a track (file in MP3/WMA mode), press and release the RPT button.
You will see RPT in the display.
Press and hold the RPT button to turn it off.
In MP3 or WMA mode
FOLDER-REPEAT - This feature, when activated, replays all the files in the selected folder in the order they are compressed in MP3/WMA.
To activate folder repeat mode, press the RPT button repeatedly until you see F-RPT in the display. The system continuously replays the current folder. Press and hold the RPT button to turn it off.
Each time you press and release the RPT button, the mode changes from file repeat to folder repeat, then to normal play.
DISC-REPEAT - To continuously replay the current disc, press and release the RPT button repeatedly until you see D-RPT in the display.
Press and hold the RPT button for 2 seconds again to turn it off.
Each time you press and release the RPT button, the mode changes from file repeat to folder repeat, to disc repeat then to normal play.
RANDOM (Random within a disc) - This feature plays the tracks within a disc in random order.
In MP3/WMA mode, all files in all folders are played in random order.
To activate random mode, press the RDM button repeatedly until you see RDM in the display. Press and hold the RDM button to turn it off.
In MP3 or WMA mode
FOLDER-RANDOM - This feature, when activated, plays the files in the current folder in random order, rather than in the order they are compressed in MP3/WMA. To activate folder random play, press the RDM button. You will see F-RDM in the display. The system will then select and play files randomly. This continues until you deactivate folder random play by pressing and holding the RDM button.
Each time you press and release the RDM button, the mode changes from folder random play, to within a disc random play, then to normal play.
SCAN - The SCAN function samples all the tracks on the disc in the order they are recorded on the disc (all files in the selected folder in MP3 or WMA mode). To activate the scan feature, press and release the SCAN button. You will see ‘‘SCAN’’ in the display. You will get a 10 second sampling of each track/file in the disc/folder. Press and hold the SCAN button to get out of scan mode and play the last track sampled.
In MP3 or WMA mode
FOLDER-SCAN - This feature, when activated, samples the first file in each folder on the disc in the order they are recorded. To activate the folder scan feature, press the SCAN button repeatedly. You will see ‘‘F-SCAN’’ in the display. The system will then play the first file in the main folders for about 10 seconds. When it plays a file that you want to continue listening to, press and hold the SCAN button. When the system samples the first file of all folders, F-SCAN is canceled, and the system plays normally.
Each time you press and release the SCAN button, the mode changes from file scan, folder scan, disc scan, then to normal play.
DISC-SCAN - This function samples the first track of each disc in the in-dash disc changer in the order they are stored. To activate disc scan, press the SCAN button repeatedly until you see D-SCAN in the display. The system will then play the first track/file of the first disc for approximately 10 seconds.
After playing the first track/file of the last disc, the system plays normally.
To Stop Playing a Disc
Press the AM, FM, AUX button, or CD/AUX, XM button to switch to the radio or satellite radio (U.S.
models), while a disc is playing.
Press the CD button again to play the disc.
If you turn the system off while a disc is playing, either with the (
 ) button or by turning off the ignition
switch, the disc will stay in the drive.When you turn the system back on, the disc
will begin playing where it left off.
) button or by turning off the ignition
switch, the disc will stay in the drive.When you turn the system back on, the disc
will begin playing where it left off.
Removing Discs from the In-dash Disc Changer
To remove the disc currently in play, press the eject button. When a disc is removed from a slot, the system automatically begins the load sequence so you can load another disc in that position. If you do not remove the disc from the changer within 10 seconds, the disc will reload into the slot. Then the system returns to the previous mode (AM, FM, or XM Radio*).
*: On U.S. EX-L model
To remove a different disc from the changer, first select it with the appropriate preset button. When that disc begins playing, press the eject button. Continue pressing the eject button to remove all the discs from the changer.
You can also eject discs when the ignition switch is off. The disc that was last selected is ejected first.
Disc Player Error Messages (EX and EX-L models without navigation system)
If you see an error message in the display while playing a disc, find the cause in the chart to the right. If you cannot clear the error message, take your vehicle to your dealer.
The chart on the right explains the error messages you may see in the display while playing a disc.
If you see an error message in the display while playing a disc, press the eject button. After ejecting the disc, check it for damage or deformation. If there is no damage, insert the disc again.
For additional information on damaged discs.
| Error Message | Cause | Solution |
| UNSUPPORTED FORMAT | Track/File format not supported | Current track will be skipped. The next supported track or file plays automatically. |
| BAD DISC PLEASE CHECK OWNERS MANUAL PUSH EJECT | Mechanical Error | Press the eject button and pull out the disc(s).
Check the disc for serious damage, signs of deformation, excessive scratches, and/or dirt see page. Insert the disc again. If the code does not disappear, or the disc(s) cannot be removed, consult your dealer. Do not try to force the disc out of the player. |
| BAD DISC PLEASE CHECK OWNERS MANUAL | Servo Error |
The ejected disc will not be reloaded automatically.
The audio systemwill try to play the disc. If there is still a problem, the error message will reappear. Press the eject button, and pull out the disc.
Insert a different disc. If the new disc plays, there is a problem with the first disc. If the error message cycle repeats and you cannot clear it, take your vehicle to a dealer..
See also:
Changing the Rear Wiper Blade Rubber
1. Raise the wiper arm off.
2. Pivot the bottom end of the wiper blade up until it comes off from the wiper
arm.
3. Slide the blade out of the wiper.
4. Remove the retainers from wiper blade ...
Tire Labeling
The tires that came on your vehicle have a number of markings. Those you should
be aware of are described below.
Tire Size
Whenever tires are replaced, they should be replaced with tires of the ...
Fog Light Bulbs
When replacing, use the following bulbs.
Fog Light: 55 W (H11 for halogen bulb type)
Passenger side
1. Remove the holding clips, then push up the
under cover.
2. Push the tab to remove the co ...